Archives for November 2017

How can I Add Users to my Office Chat network?

Office Chat enables you to add/invite users to your Office Chat Domain in the following ways:

How do I go to the Admin Portal?

If you are a network administrator of your Office Chat domain you should see the Admin” button at the right top next to the Conversations icon; Kindly refer screenshot here:

Admin Portal

In-case you are not the domain Admin, you would not see the “Admin” button as shown above.

What kind of files can be sent using Office Chat?

Currently Office Chat supports more than 50 files types and the list continues to grow. The supported file types are listed below. 

Image Extensions: “jpeg”, “pjpeg”, “gif”, “png”, “x-png”, “jpg”, “bmp” 

Video Extensions: “flv”, “mp4”, “avi”, “wmv”, “3gp”, “m4v”, “mov”, “mpg”, “mpeg”, “m2v”, “3g2”, “3gpp”, “asf”, “dat”, “divx”, “dv”, “f4v”, “m2ts”,
“mkv”, “mpe”, “mpeg4”, “mts”, “nsv”, “ogm”, “ogv”, “qt”, “tod”, “ts”, “vob” 

Audio Extensions: “m4a”, “aif”, “aiff”, “au”, “flac”, “ogg”, “ra”, “wav”, “wma”, “mp3” 

Doc Extensions: “doc”, “doc6”, “docx”, “docbook”, “html”, “odt”, “pdf”, “rtf”, “txt”, “pptm”, “ppt”, “pptx”, “ods”, “xls”, “xls5”, “xls95”, “xlsx”, “xlt”, “xlt5”, “xlt95”, “csv”, “xltx”,
“htm”, “ott”, “ppsx”, “xla”, “xltm”, “dotm”, “potx”, “gdoc”, “odp”, “xml”, “dot”, “docm”, “potm”, “dotx”, “xlsm”, “xlsb”, “mobi”, “wps”, “xsl”, “dif”, “sxc”, “stc”, “fods”, “uos”, “sxw”, “stw”, “fodt”, “uot”,”eml” 

Archive Extensions: “zip”, “jar”, “tar”, “tar.gz”, “tar.bz2”, “gz” 

How will I get notified about messages when I am offline?

With Office Chat you can setup your users to receive an email digest for new messages when they’re offline for more than 30 mins.

When someone sends you messages on Office Chat and you happen to be offline, you will receive an email. This will help you to keep yourself updated whenever you are not able to be online on your Office Chat network. 

To enable Email Notifications for offline messages: 

  1. Log in to Office Chat in your browser and go to the Admin Portal
  2. On the left hand navigation menu, find and click on ‘Domain
  3. Find and click on ‘Email Settings 
  4. Here, under ‘Notifications‘, you can select to enable Email Notifications for Offline Messages 
  5. Click Save to register your preferred settings 

The video illustrates how you can enable Email digest for Offline Messages:


How can I upgrade once my 7 day free Office Chat Trial is over?

You can view detailed plan features and pricing details here: https://officechat.com/office-chat-pricing. We offer the following plans : StartupBusiness and Enterprise 

Once you have selected the plan as per your choice:

  1. Login to your Office Chat domain on the web browser with your Login ID and Password.  
  2. You will be redirected to a page that will ask you to upgrade to one of our Plan: StartupBusiness or Enterprise 
  3. Select the appropriate plan as well as the payment period (either Monthly or Yearly) according to your choice  
  4. Now enter your credit card details and click on the button below. You will be upgraded to our Premium Plans. 

In case you are facing any issues during the upgrade, our support team is standing by to help you using live chat (option available on all pages).

** If you are interested in Office Chat Starter Plan, get in touch with us at Support@OfficeChat.com or via the Live Chat available on www.OfficeChat.com 

How to Initate a Video, Voice Call or Screen Sharing with Office Chat ( Inbuilt feature and with GotoMeeting & Join.me)

If you need to connect by video call or share your screen with your colleagues, you can use our Huddle feature to do so. 

Office Chat enables voice calling, video calling and screen sharing with its inbuilt feature or with external apps like GoToMeeting, join.me. This helps employees to easily share their screen,  conduct audio conferencing and video conferencing with co-workers across the globe. As a network admin, you can enable one of these services for all network users on your domain. 

To enable Huddle: 

  1. Use a web browser to log into your Office Chat domain
  2. Navigate to the admin portal
  3. Click on the “Integration” Tab from the left navigation and then on the ‘Huddle’ Tab.
  4. Here it is important to enable to ‘Huddle’ feature.
  5. Select the ‘Office Chat’  option to enable 1-on-1 voice, video call and screen sharing features for your domain and click on ‘Save’.
  6.  To enable any other third party applications: GoToMeeting and Join.Me, select the corresponding option and clickon ‘Save’.18-12-2018-12-36-39.png
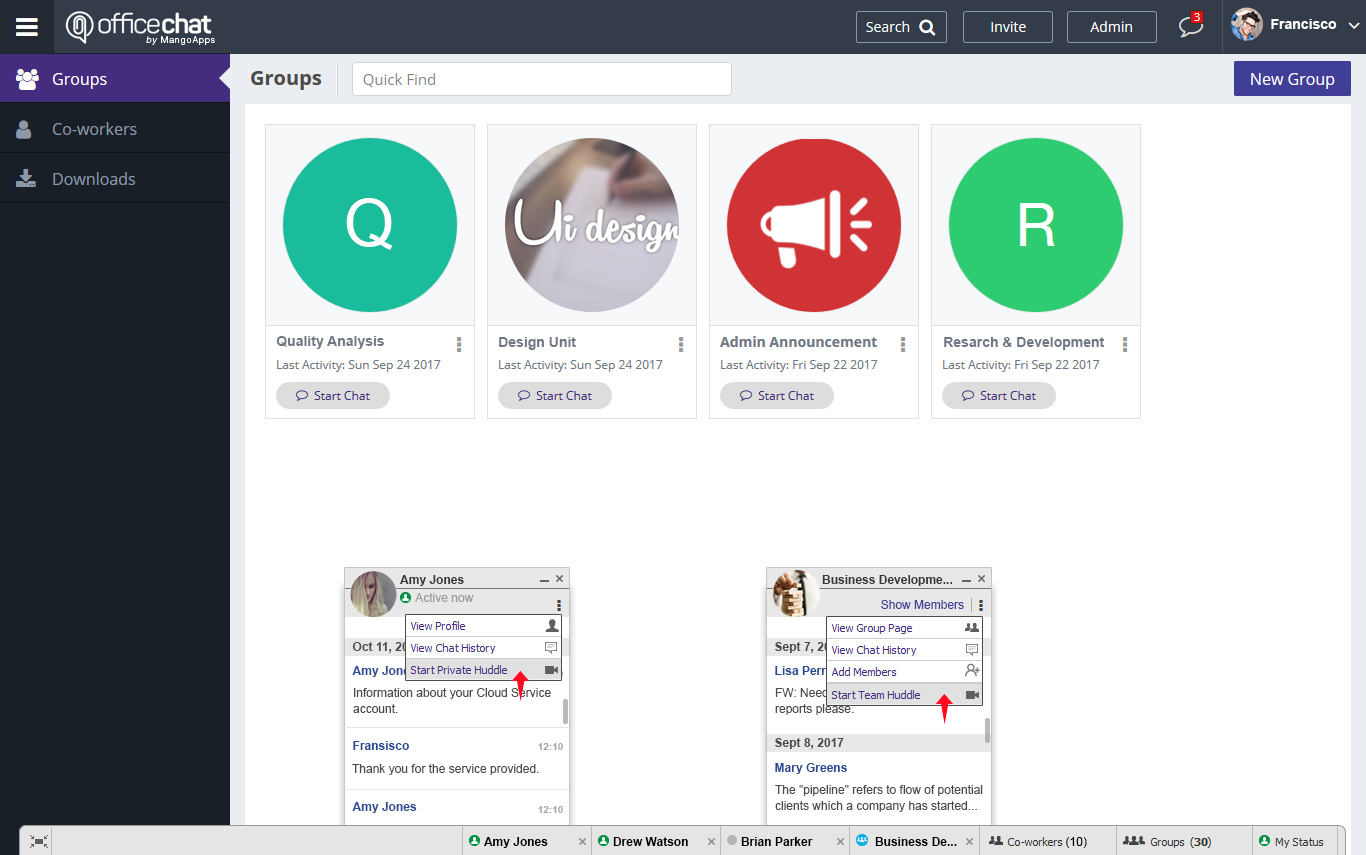
Once Huddle is enabled, the integration will be available from private chat and team chat on the IM bar by clicking on Start a private huddle or Start a team huddle action items.

Huddle


Check out the following video to understand how you can make a voice or video call to your colleague from the Web Browser:


Inbuilt Office Chat voice and video calling on the desktop client:

You can enable the inbuilt voice and voice calling and screen sharing features from the Office Chat Desktop Client too.

To do so, you will first have to install VC++ 2015 as a pre-requisite on your system. If the prerequisite ( VC++2015 ) is not installed, Office Chat desktop client will request your permission to install it and then proceed with the enabling voice and video calling features.

Also, if in case there is no webcam or video calling device installed on your desktop, the call will be connected using an audio or screen sharing connection.


Once these prerequisites are installed you can easily initiate and join a video call, as shown below:

While initiating a Call from the desktop client:

When a Call is initiated:

To join any video call, the receiver simply has to click on the ‘Join’ button:

When the receiver joins the call:


During the call, the following are the call options:

To Turn on/off the Webcam:

To share your screen on the video call:


To leave/ disconnect the video call:


How can I restrict access to Office Chat from outside?

Office Chat Admins can choose to allow only specific IP addresses to access their Network. 

To help protect your organization’s data from unauthorized access, you can specify a list of IP addresses from which users can log in. Users outside of the specified login IP ranges cannot access the web portal. 

Note: IP ranges between 192.168.0.0 – 192.168.255.255 are not accepted as these are private IP ranges and cannot be used on the internet. 

To restrict access on a single or on multiple IP ranges refer to the diagrams and steps below: 

  1.  Log in to Office Chat in your browser and go to the Admin Portal 
  2. Click on ‘Security’ from theleft hand navigation menu 
  3. Click on Browser Access and navigate to IP range configuration.
  4. Define one or more IP ranges & click on the “Save Settings” button to register your settings. 

IP Whitelisting

How can I restrict Users from creating their own Groups?

With Office Chat you can easily restrict Users from creating Groups from the Admin Portal.  

To update Group Creation Settings from the Admin Portal:  

  1. Log in to Office Chat in your browser and go to the Admin Portal
  2. On the left main navigation menu, find and click on “Group” 
  3. Here on the top right hand side of the page, find and click on ‘Manage Settings’ 
  4. You can now select who will be able to create new groups: 
    • Any User 
    • Only Domain Admins 
  1. Click Save to register your preferred settings 

The following video illustrates how you can restrict users from creating groups from the Admin Portal:

How can I restrict Users from deleting conversations with fellow users?

With Office Chat you can control user behavior and restrict Users from deleting conversations with fellow users.

This control is available for Private Chat and Group Chat from the Admin Portal.  

To update Delete Settings in Private Chat or Group Chat:  

  1. Log in to Office Chat in your browser and go to the Admin Portal
  2. On the main navigation menu, find and click on “Compliance” 
  3. Here under ‘Delete Settings’ Tab you can select for Private Chat as well as Group Chat 
  4. For Private Chat, you can select one of the following options:
    • No one can delete messages  
    • User can delete own messages 
  1. For Group Chat, you can select one of the following options:
    • No one can delete messages  
    • Only group admins can delete messages
    • User can delete own messages 
  1. Click Save to register your preferred settings 

You can view the following video to restrict Users from deleting conversations with fellow users: 


How do I sign a BAA Agreement with Office Chat? 

“BAA” is an acronym for “business associate agreement”. BAAs are hybrid contractual and regulatory instruments, meaning both the parties satisfy HIPAA regulatory requirements. 

To initiate the BAA process a few things will need to occur. 

  1. To get a BAA,  Office Chat will be available only on the Enterprise Annual Plan. You can see the pricing here: https://officechat.com/office-chat-pricing 
  2. We will create a new domain on a special server. You can let us know what name you need, for example: (Current domain / Companyname). The special server runs on a 7-day auto destruct meaning nothing is kept after 7 days. 
  3. Once you have access to your new domain, please invite your staff to this new Office Chat domain. At this point we will suspend the old domain. (This old domain will be deleted once the entire process is completed)
  4. Add your credit card details to the billing area.
  5. We will send you the BAA to sign. Following which we will sign the documents and send you a completed BAA for your records. 
  6. If you have an existing account, we will internally transfer any remaining funds to the new domain or refund them depending on if we are switching plans or what the situation calls for. 

To start, please fill out and email this information to Support@OfficeChat.com with the Subject Line: ‘Office Chat BAA Agreement’ 

  1. Office Chat Domain name: 
  2. Office Chat Admin Email: 
  3. Email of the person to send the BAA agreement (if different than admin): 
  4. A number of user seats needed (you start with 50): 
  5. Your current Office Chat plan is (If Applicable): 
  6. Acknowledge this will be the Enterprise annual plan: $999 for a year (type Yes) :