How Do I Enable Google Apps for SSO in Office Chat?

Google Apps authentication (OAuth 2.0) allows users to sign in to Office Chat using their Google Apps accounts. This feature can be enabled by Network Administrators.

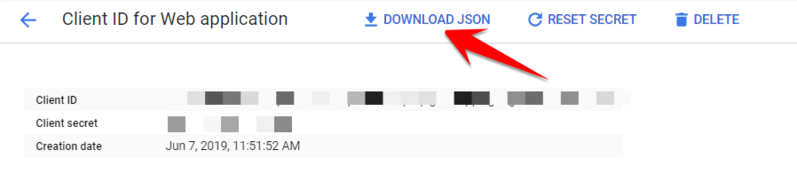
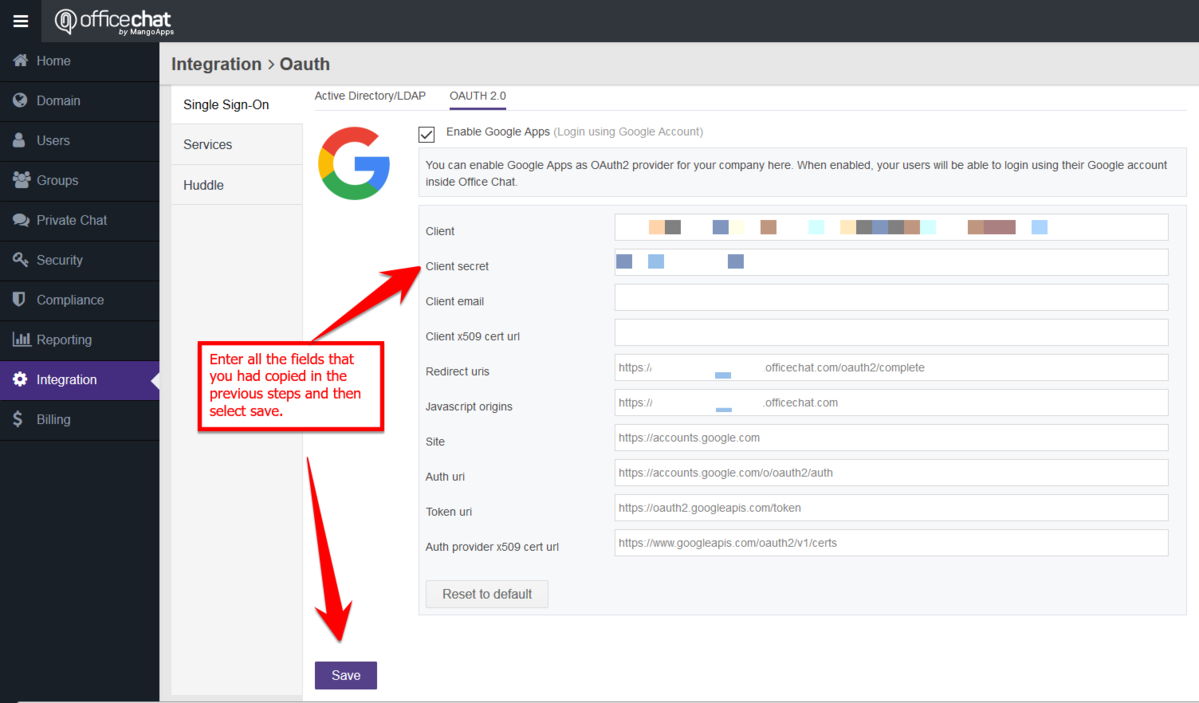
How to use Custom OAuth App for Google see this article.

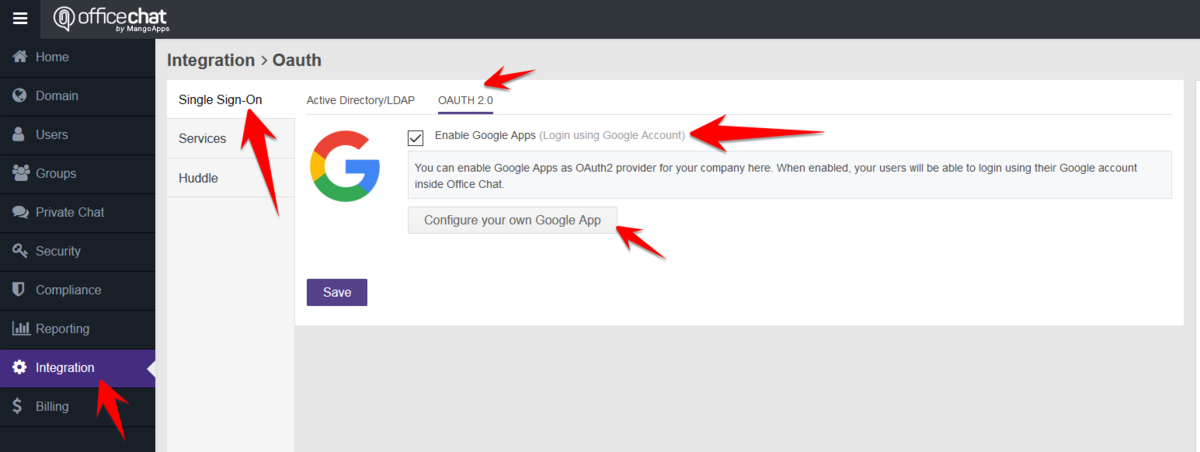
To enable the Google Apps authentication from the Admin Portal:

1) Navigate to Admin Portal and then select “Integration” in the left navigation.

2) Here, select ‘Single Sign-On’ and then the Tab ‘OAuth 2.0’

3) You will then have to enable the option: ‘Enable Google Apps (Login using Google Account)’ and click ‘Save’

Kindly note when enabled, your users will be able to login using their Google account inside Office Chat.

TinyTake11-06-2019-11-52-50_636958309747478724_636958310924431868.png

How to Use Custom OAuth App for Google with Office Chat?

Office Chat can be configured with custom OAuth Google app. This will also enable BAA/HIPAA plan customers to use OAuth for Google.

How to enable Google Apps for SSO within Office Chat. See this article.

Step 1 Google Apps – Custom Credentials

  • Obtain OAuth credentials from the Google API Console.
    https://console.developers.google.com/
  • Create a project by going to the Google APIs select Dashboard and Create a new project.
  • To Create credentials, select credentials and Create credentials, then select OAuthclient ID.
  • Next, for Application type select Web application. Set the URLs to your Office Chat URL Authorized JavaScript origins:
    https://*YourDomainName*.Office Chat.com
    And
    Authorized redirect URIs to: https:// *YourDomainName*.Office Chat.com/oauth2/complete
  • Copy the Client ID and Client Secret this will be used later on in the process.
  • Now, download the credentials by clicking on ‘Download JSON’

Step 2 Office Chat OAuth 2.0 Integration

  • Login to Office Chat as a Network admin via the web browser
  • Go to the admin portal, Then click on ‘Integration’ on the left-hand side navigation menu
  • Here, select the tab ‘OAuth 2.0′ Tab, then ‘Enable Google apps’ and ‘Select Configure your own Google App’.

Enter all the fields that you had copied in the previous steps and then select save.

Now update the above fields with the following details:

  • Client – Application ID
  • Client secret – Found in Credentials “Copy and Paste the same”
  • Client email – Optional
  • Client x509 cert url – Optional
  • Redirect URLs – Found in Credentials and Authorized redirect URLs
  • Javascript origins – this is https://<customer’s your=”” domain=”” style=”box-sizing: border-box;”></customer’s>
  • Auth URL – auto populates /o/oauth2/auth
  • Token URL – auto populates /o/oauth2/token
  • Auth provider x 509 cert url – Optional


How do I Enable / Disable a device from the Admin Portal

With Office Chat, you as an administrator can easily disable/enable any device that has access to your network. With Office Chat User devices feature, each user that has connected via native Mobile apps to your domain is listed here. Their username, device type, device ID, last activity, and status is shown in this list. Network administrators can disable individual users at the device level and wipe out all of the network content on their device using the “Actions” drop-down menu.

To disable any device from the admin portal:

  1. Login to Admin Portal from the web browser and navigate to ‘Security’ tab on the Left-Hand side Navigation menu
  2. Here Click on the ‘User Devices’ Tab and search for the user whose device has to be disabled.
  3. Once the users’ active devices are listed, please click on the drop-down button and click on ‘Disable Access’

Disable Access


To enable any device from the admin portal:

  1. Login to Admin Portal from the web browser and navigate to ‘Security’ tab on the Left-Hand side Navigation menu
  2. Here Click on the ‘User Devices’ Tab and search for the user whose devices has to be enabled.
  3. If in case there are any disabled devices, please click on the drop-down button and click on ‘Enable Access’

Enable Devices

How do I view/delete private chat history?

Private Chat History

Office Chat allows you the admin to view/ delete private 1 on 1 conversation with the Office Chat network. An Office Chat admin can view and delete private Chat History for the Admin portal. The feature to view and delete Private Chat History is available only for the Enterprise Plan and HIPAA/BAA Plan. Please check the Plans, features and pricing details here: https://officechat.com/office-chat-pricing

Using the Office Chat Admin Portal

1.Login to your Office Chat domain URL in a browser with your login credentials and access the Admin Portal
2. Choose the “Private Chat” tab in the left navigation.
3. Click on the drop-down next to the User conversations you want to view and click “View Chat History”.

OC Private Chat History

4. To delete the private chat history, Click on the ‘More tools’ icon and select ‘Delete Messages’ option. You can proceed to delete all messages or only selected messages from the Private Chat History.
OC Delete Private Chat Messages

How to Configure MailChimp with Office Chat

MailChimp is an online email marketing service for managing contacts, sending emails, and tracking results of your teams email campaigns.

To integrate Office Chat with MailChimp:

Step 1:

In your Group, click on Configure Integrations in the Admin Tools. Please note: You need to be the admin to configure MailChimp for your team.

Mail Chimp Configure Integrations


Step 2:

Enable MailChimp in the list of integrations.

Mail Chimp Configure Integrations 2


Please note: If you don’t see MailChimp, please contact your domain administrator to enable it from ‘Admin Portal > Integrations > Services’ page.

Mail Chimp Configure Integrations 3


Step 3:

In the MailChimp settings dialog, click on Authenticate with MailChimp to login into the MailChimp account and authorize Office Chat on MailChimp.

Mail Chimp Configure Integrations 4

Then Select 1 or more of the MailChimp lists from which the events will be posted into this team. You will be required to select a minimum of 1 MailChimp list from the dropdown. Click the Save Settings button when you are done.

Mail Chimp Configure Integrations 5


Setup instructions to follow on MailChimp side

Since Office Chat automatically does the webhook configuration once you have authenticated and connected the Office Chat account to MailChimp, there is no setup required on MailChimp side for this integration to work. It’s that easy!


How do I change Office Chat preferences?

To change the Office Chat preference from your Windows desktop app:

  1. Click on the “Profile” icon right next to the Name and the Status on the top left-hand side of the app window.
  2. Here Select the Preferences Tab to open the Preferences Dialog box.
  3. Once the preferences dialog box opens, the “General” tab has most of the common preference settings, like starting Office Chat client on Windows startup, Show Co-workers Status, etc.


  • If you want to change the Notification Settings for the Office Chat Windows App, go to the application preferences and navigate to the ‘Alert & Notifications’ Tab

Office Chat Windows Notification

  • If you want to change your Office Chat Theme and display options, Click on ‘Chat Theme’ Tab to modify your preferences.

Office Chat Windows Chat Theme

  • If you are connecting to the internet from behind a proxy server or to check your connectivity with the internet, then use the “Connections” tab to enter the proxy server details.

  • If you want to check the Office Chat version and manually update your Office Chat Windows, Click on the ‘About’ Tab.

Office Chat Windows About Us

Can I Change my Office Chat plan anytime?

Yes, Office Chat allows you to change/update your Office Chat plans to Enterprise, Business or Startup plan at any point in time.

In order to change your Office Chat Plan, take a look at the following steps:

  1. Use a web browser to log into your Office Chat domain.
  2. Navigate to the admin portal
  3. Click on the “Billing” from the left navigation then ‘Plans’.
  4. Scroll down and  choose the desired plan and then click on ‘ Select Plan’,Change Plan
  5. Select the billing cycle either ‘Monthly’ or ‘Yearly’ for your selected plan.
  6. Enter your Credit card details and Billing address and click on ‘Complete Upgrade’.Change Plan 2
  7. Now once you have completed the upgrade procedure, go to ‘Billing’> Plan’ on the left-hand navigation menu to check the details of your updated plan


How do I setup integeration with Slack

In case your organization is already using Slack you can integrate the same inside teams in Office Chat to get real-time notification from Slack to Office Chat and vice-versa.

To integrate Slack with Office Chat:

1)  Ensure Slack is enabled in the Admin Portal. Then proceed with the configurations as shown in the figure below:
Slack 1


2. Navigate to ‘Groups’  and select the group that you want to integrate Slack with. Once you have selected the Group, click on the ‘More Tools’ icon (three dots) and select ‘Configure Integrations’

Slack 2


3. Click “Enable” besides Slack from the list of available integrations and you will be presented with a pop-up to Configure Slack in Office Chat.
Slack 3


4. Here’s a brief on each of the fields to configure the integration:

  • Webhook URL: This is the URL that you will need paste into Slack outgoing webhooks integration, this cannot be modified and is required to be copied and pasted as is in Slack.
  • Customize Name: Choose a username that messages from this integration will be posted as.
  • Authenticate with Slack: Click to authenticate Slack in Office Chat to enable the integration, this is a mandatory step to configure the integration.


5. Go to your Slack team Integrations settings. Open it from Slack app menu or via direct URL https://yourdomain.slack.com/services. Select the Slack Channel you wan to integrate and then the gear along the top and Integration from the drop down.

Slack 5


6. Then create a new Outgoing webhook integration by searching for “Outgoing Webhooks” in the app directory then adding the same by clicking ‘Add Configuration’.

Slack 6


7. Once installed, scroll to “Integration Settings” and paste the Webhook URL from Office Chat into “URL(s)” and Save Settings.
Slack 8


8. Once done, please double check whether the Link is correct. Go back to the project and select Authenticate and Authorize from the following popup.

Slack 9


9. Once Authorized, confirm the success message and Save the Settings.

Slack 10

Now you should receive messages posted in Slack as feeds in Office Chat Group. Let’s take a look to exactly what that experience will look like.

Slack 11

How to Set Two-factor Authentication (2FA) with Office Chat

About Two Factor Authentication

Two factor authentication (2FA) provides a more secure login process because when users try to sign in, they’ll have to provide two pieces of information:

  • The account password.
  • A single-use authorization code generated by a mobile app (e.g. Google Authenticator) OR an email message.

This is similar to a cash withdrawal machine at the bank, which requires both a debit card and a personal identification number (PIN). The difference here is that you’ll have to use a different authorization code every time you sign in, because an authorization code expires after it’s used. The network administrators can enable 2FA for all network users.

NOTES:
  • Two factor authentication is applied to all users (Network & guest) when logging into their Office Chat domain using the default authentication of the mechanism of Office Chat (i.e. email & password).
  • When logging in via Google Apps or other SAML providers this setting would not be applicable.
  • This feature is available to users logging in from Web, Desktop and MAC only.

Enabling Two Factor Authentication

To Activate the feature in Office Chat:

  1. Go to the Admin portal > Security > Browser access page
  2. Scroll to the Two factor authentication settings and choose the type of authentication from the drop-downThere are two different ways to retrieve authentication codes to use during login. You can either:
  • Enable 2FA token via email OR
  • Enable 2FA token via Authenticator app
  1. Set the Authentication validity period
  2. Click Save Settings

How Two Factor Authentication works once enabled:

Login via Web:

Step 1: Users log in with Username and Password

Step 2: User gets a secure code via email or an authenticator app on the mobile as configured by the network admin during set up.

Step 3: The user provides the secure code in the browser to access the account.

Steps to Reset Two Factor Authentication for Users (Admin function)

The domain administrator can reset the 2FA for users in case they lose access to the mobile device they used at the time of 2FA activation.

  1. Go to the admin portal > Users
  2. Select the user by clicking on the checkbox.
  3. Click on “User Tools” from the right side then click “Reset QR code.”
  4. The next time the user logs in, the user can set up 2FA from the beginning, providing a code from the authenticator.

Recommended Authenticator apps

You’ll need to download an authenticator app to your mobile device. The app will be able to scan QR codes and retrieve authentication data for you.

Here are some recommended authenticator apps., you can follow the links to download and install them:

The QR code will be shown next time the user logs in.
For example this is a user logging in from the web browser.

How do I sign to the Office Chat HIPAA/BAA plan ?

To signup for the Office Chat HIPAA/BAA plan:

Office Chat offers HIPAA/BAA plan that conforms to the HIPAA‘s security requirements and we have a separate specialized server for total HIPAA compliance. Hence, in order to signup for our HIPAA/BAA plan, we request you to signup for it following the below steps:
2) Under the HIPAA/BAA plan, click on ‘Signup for Free’ button
3) You will have to enter your email id and contact details to complete the signup process

4) Upon creating your account, you will immediately receive a confirmation email with your temporary password

To switch from your current existing Enterprise/Business/Startup plan to HIPAA/BAA Plan:

Office Chat offers HIPAA/BAA plan that conforms to the HIPAA‘s security requirements and has a separate specialized server for total HIPAA compliance.  Hence, another domain will have to be created on the HIPAA/BAA servers and we cannot use your current Enterprise/Business/Startup plan domain.

1) To switch your existing plan to HIPAA/BAA plan, write to us on Support@OfficeChat.com with your existing domain name and the preferred domain name for your new HIPAA/BAA  Office Chat domain. Eg: YourCompanyName.OfficeChat.com

2) We will then delete the non-HIPPA compliant Office Chat domain and create a new Office Chat domain on HIPAA/BAA complaint server as per the name requested by you.
3) You can then log in, complete the billing details and reinvite all your users, to this new HIPAA/BAA complaint domain.
4) Once this the change is complete we will send you a BAA document to print, sign, scan and send back, where we will do the same and send you a completed BAA. You will need this document to be HIPAA compliant. There is no additional cost for this processes or the BAA etc.
Kindly Note:
  • All the amount that was paid towards your Enterprise plan will get adjusted and transferred to your HIPAA/BAA plan on a pro-rata basis.
  • Also, note the billing for Office Chat HIPAA/BAA plan is done annually.
If in case you have further queries, feel free to reach out to us on Support@OfficeChat.com