How to Use Custom OAuth App for Google with Office Chat?

Office Chat can be configured with custom OAuth Google app. This will also enable BAA/HIPAA plan customers to use OAuth for Google.

How to enable Google Apps for SSO within Office Chat. See this article.

Step 1 Google Apps – Custom Credentials

  • Obtain OAuth credentials from the Google API Console.
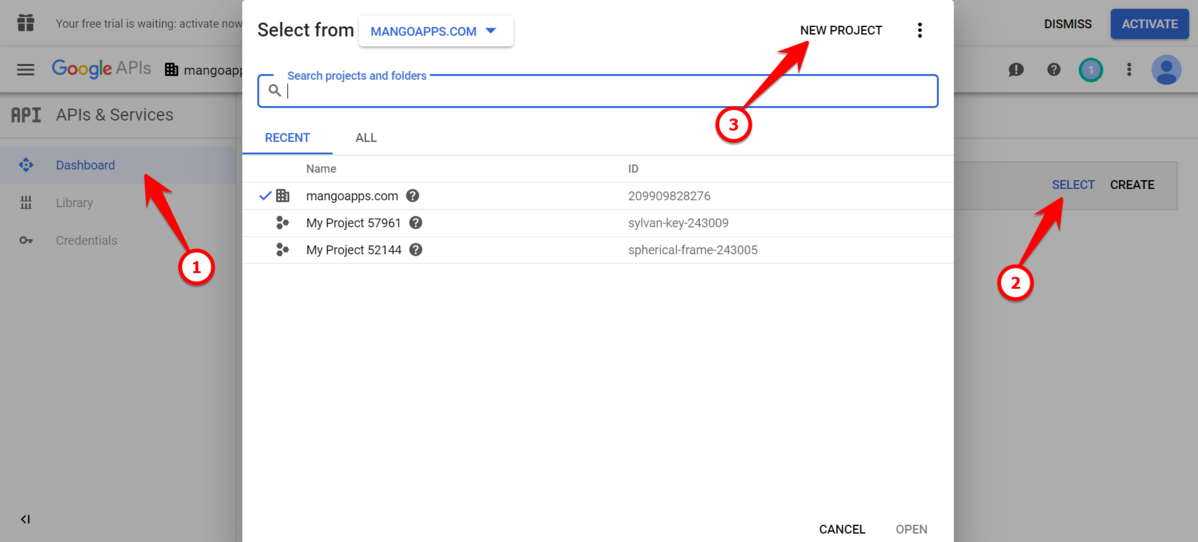
    https://console.developers.google.com/
  • Create a project by going to the Google APIs select Dashboard and Create a new project.
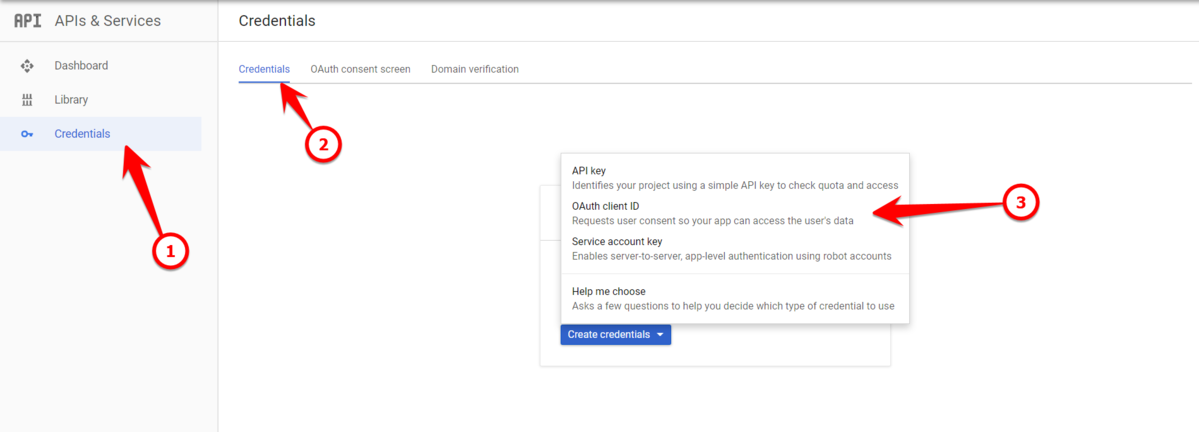
  • To Create credentials, select credentials and Create credentials, then select OAuthclient ID.
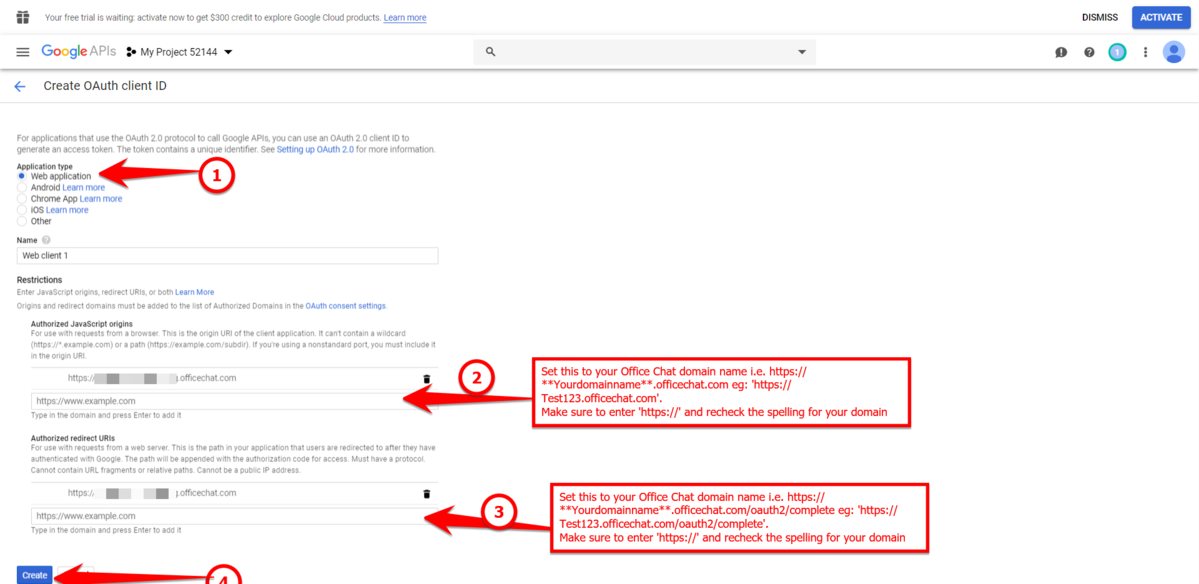
  • Next, for Application type select Web application. Set the URLs to your Office Chat URL Authorized JavaScript origins:
    https://*YourDomainName*.Office Chat.com
    And
    Authorized redirect URIs to: https:// *YourDomainName*.Office Chat.com/oauth2/complete
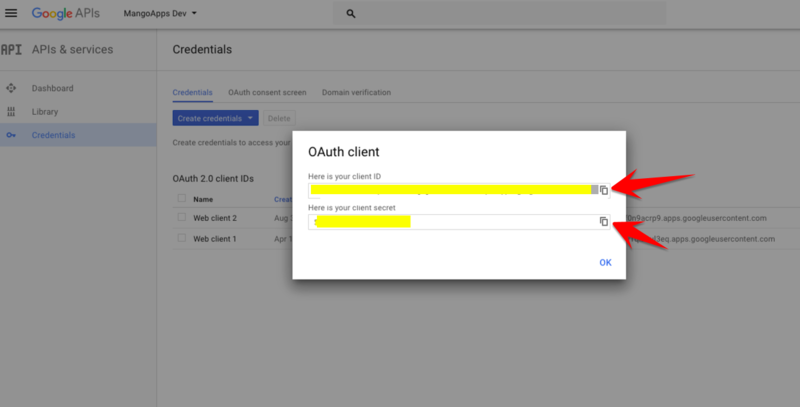
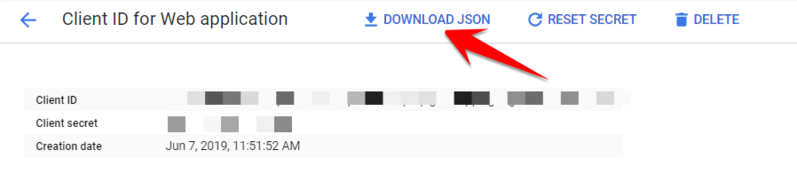
  • Copy the Client ID and Client Secret this will be used later on in the process.
  • Now, download the credentials by clicking on ‘Download JSON’

Step 2 Office Chat OAuth 2.0 Integration

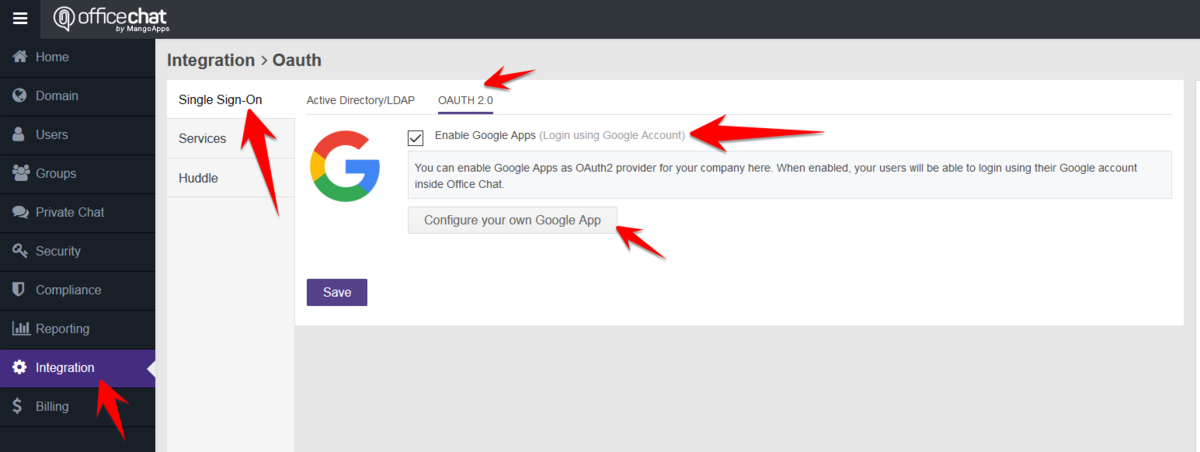
  • Login to Office Chat as a Network admin via the web browser
  • Go to the admin portal, Then click on ‘Integration’ on the left-hand side navigation menu
  • Here, select the tab ‘OAuth 2.0′ Tab, then ‘Enable Google apps’ and ‘Select Configure your own Google App’.

Enter all the fields that you had copied in the previous steps and then select save.

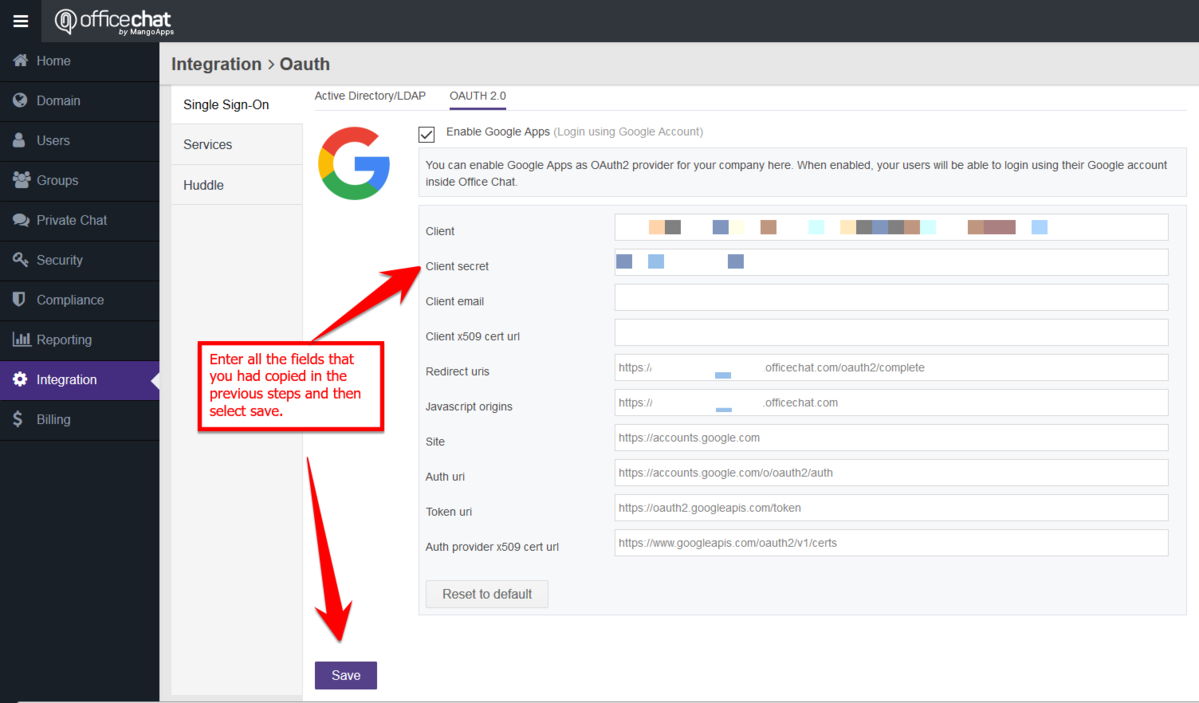
Now update the above fields with the following details:

  • Client – Application ID
  • Client secret – Found in Credentials “Copy and Paste the same”
  • Client email – Optional
  • Client x509 cert url – Optional
  • Redirect URLs – Found in Credentials and Authorized redirect URLs
  • Javascript origins – this is https://<customer’s your=”” domain=”” style=”box-sizing: border-box;”></customer’s>
  • Auth URL – auto populates /o/oauth2/auth
  • Token URL – auto populates /o/oauth2/token
  • Auth provider x 509 cert url – Optional


How do I Enable / Disable a device from the Admin Portal

With Office Chat, you as an administrator can easily disable/enable any device that has access to your network. With Office Chat User devices feature, each user that has connected via native Mobile apps to your domain is listed here. Their username, device type, device ID, last activity, and status is shown in this list. Network administrators can disable individual users at the device level and wipe out all of the network content on their device using the “Actions” drop-down menu.

To disable any device from the admin portal:

  1. Login to Admin Portal from the web browser and navigate to ‘Security’ tab on the Left-Hand side Navigation menu
  2. Here Click on the ‘User Devices’ Tab and search for the user whose device has to be disabled.
  3. Once the users’ active devices are listed, please click on the drop-down button and click on ‘Disable Access’

Disable Access


To enable any device from the admin portal:

  1. Login to Admin Portal from the web browser and navigate to ‘Security’ tab on the Left-Hand side Navigation menu
  2. Here Click on the ‘User Devices’ Tab and search for the user whose devices has to be enabled.
  3. If in case there are any disabled devices, please click on the drop-down button and click on ‘Enable Access’

Enable Devices

How to Configure MailChimp with Office Chat

MailChimp is an online email marketing service for managing contacts, sending emails, and tracking results of your teams email campaigns.

To integrate Office Chat with MailChimp:

Step 1:

In your Group, click on Configure Integrations in the Admin Tools. Please note: You need to be the admin to configure MailChimp for your team.

Mail Chimp Configure Integrations


Step 2:

Enable MailChimp in the list of integrations.

Mail Chimp Configure Integrations 2


Please note: If you don’t see MailChimp, please contact your domain administrator to enable it from ‘Admin Portal > Integrations > Services’ page.

Mail Chimp Configure Integrations 3


Step 3:

In the MailChimp settings dialog, click on Authenticate with MailChimp to login into the MailChimp account and authorize Office Chat on MailChimp.

Mail Chimp Configure Integrations 4

Then Select 1 or more of the MailChimp lists from which the events will be posted into this team. You will be required to select a minimum of 1 MailChimp list from the dropdown. Click the Save Settings button when you are done.

Mail Chimp Configure Integrations 5


Setup instructions to follow on MailChimp side

Since Office Chat automatically does the webhook configuration once you have authenticated and connected the Office Chat account to MailChimp, there is no setup required on MailChimp side for this integration to work. It’s that easy!


How do I setup integeration with Slack

In case your organization is already using Slack you can integrate the same inside teams in Office Chat to get real-time notification from Slack to Office Chat and vice-versa.

To integrate Slack with Office Chat:

1)  Ensure Slack is enabled in the Admin Portal. Then proceed with the configurations as shown in the figure below:
Slack 1


2. Navigate to ‘Groups’  and select the group that you want to integrate Slack with. Once you have selected the Group, click on the ‘More Tools’ icon (three dots) and select ‘Configure Integrations’

Slack 2


3. Click “Enable” besides Slack from the list of available integrations and you will be presented with a pop-up to Configure Slack in Office Chat.
Slack 3


4. Here’s a brief on each of the fields to configure the integration:

  • Webhook URL: This is the URL that you will need paste into Slack outgoing webhooks integration, this cannot be modified and is required to be copied and pasted as is in Slack.
  • Customize Name: Choose a username that messages from this integration will be posted as.
  • Authenticate with Slack: Click to authenticate Slack in Office Chat to enable the integration, this is a mandatory step to configure the integration.


5. Go to your Slack team Integrations settings. Open it from Slack app menu or via direct URL https://yourdomain.slack.com/services. Select the Slack Channel you wan to integrate and then the gear along the top and Integration from the drop down.

Slack 5


6. Then create a new Outgoing webhook integration by searching for “Outgoing Webhooks” in the app directory then adding the same by clicking ‘Add Configuration’.

Slack 6


7. Once installed, scroll to “Integration Settings” and paste the Webhook URL from Office Chat into “URL(s)” and Save Settings.
Slack 8


8. Once done, please double check whether the Link is correct. Go back to the project and select Authenticate and Authorize from the following popup.

Slack 9


9. Once Authorized, confirm the success message and Save the Settings.

Slack 10

Now you should receive messages posted in Slack as feeds in Office Chat Group. Let’s take a look to exactly what that experience will look like.

Slack 11

How to Configure LDAP / Active Directory Authentication in Office Chat?

As part of your Office Chat Enterprise subscription, your users can be authenticated through LDAP and Active Directory. This article will step you through the process by answering:

Where can I find the LDAP configuration settings in the Admin Portal?

  1. Using the Web Client, Go to Admin Portal, then click on Integration & Under ‘Single Sign-On’ , Enable the checkbox “Active Directory/LDAP Integration”
    Office Chat LDAP AD

What access do you need to integrate your active directory / LDAP server?

  • You will need to allow incoming access from the IP address: 50.16.226.155
  • You will need to allow incoming access to LDAP port 389 and secure LDAP port 636

What do the different configuration fields mean?

  • Server Type & Account/UPN Suffix:  You have a choice between “Active Directory” and “OpenLDAP” servers. Choosing “Active Directory” enables the additional “User Setting” section where you define the account suffix (UPN Suffix) that is configured for your AD.
  • Host Name & Port:  The LDAP server and port you are connecting to.
  • Base DN:  The base distinguished name of your LDAP used for the base search.
  • Administrator DN & Password:  User authentication for a user that has search capability and is able to perform all read-only directory operations.

ldap-1

What do all the fields mean in Connection Settings of the LDAP/AD configuration Page?

Office Chat LDAP AD Connection
To go through each choice and setting one-by-one:

  • Server Type & Account Suffix:  You have a choice between “Active Directory” and “OpenLDAP” servers. Choosing “Active Directory” enables the additional “User Setting” section where you define the account suffix (UPN Suffix) that is configured for your AD.
  • Host Name & Port:  Enter the name of the server where your AD/LDAP is hosted, example: ldap.example.com. Also,  enter the port on which your directory server is listening, examples: 389 (non-SSL LDAP), 636 (SSL LDAP).
  • Base DN:  The root distinguished name (DN) to use when running queries against the directory server. Example: ou=people, dc=example, dc=com
  • Groups Base DN: is the base distinguished name of your AD used for the base search.
  • UPN Suffix: Account suffix or UPN suffix will be appended to all usernames in the Active Directory authentication process. (e.g @company.local). Don’t forget to put the @
  • Administrator DN & Password:  User authentication for a user that has search capability and is able to perform all read-only directory operations. Enter a distinguished username & password of a user that will allow Office Chat to connect to the directory server. Connecting to the directory server requires that Office Chat log in to the server with the username and password configured here.

For Step 2 of Configuration, what do I put in each of the fields?

Office Chat LDAP AD Mapping

Note: All user profile fields will be synced when the user logs in or a manual sync are performed.

  • Username:  The field name on which username lookups will be performed on. If this value is not set the default value is uid. Active directory users should try the default value of sAMAccountName.
  • Full Name:  Users’ full names.
  • Email:  Users’ emails.
  • Title:  Users’ position titles.
  • Work Landline:  The mapping for users’ work landline telephone number.
  • Desk Extension: The mapping for users’ work desk extension numbers.
  • Work Mobile:  The mapping for users’ work mobile phone numbers.
  • Home Landline:  The mapping for users’ home landline telephone numbers.
  • Fax Number:  The mapping for fax information.
  • User Object Filter:  Is used to restrict the numbers of users that are permitted to access Office Chat. In essence, the filter limits what part of the LDAP tree Office Chat syncs from. The most common usage of a search filter is to limit the entries that are users based on objectClass. For example, a reasonable search filter for a default Active Directory installation is:

(objectClass=organizationalPerson)

When combined with the default filter, the actual search executed would be:

(&(sAMAccountName={0})(objectClass=organizationalPerson))

A filter should be written for user membership. This ensures that you are not flooding your Office Chat domain with users that do not need access to your content. When constructing a filter it is best to pick a common attribute of the set of users you want to allow access to Office Chat. For example, if my users are distinguished by having two objectClass attributes (one equal to ‘person’ and another to ‘user’), this is how I would match for it:

(&(objectClass=person)(objectClass=user))

Notice the ampersand symbol ‘&’ symbol at the start. Translated this means: search for objectClass=person AND object=user

Alternatively, (|(objectClass=person)(objectClass=user))

Translated this means: search for objectClass=person OR object=user.

The pipe symbol ‘|’ denotes ‘OR’. As this is not a special XML character, it should not need escaping.

If you know that only some of the users in your LDAP database should be known to the application, one way to get that subset is to create an LDAP department (such as ‘managementteam’), then filter off that department attribute for users. Here’s an example:

(&(objectClass=uidObject)(department=managementteam))

This way you don’t have to create any new OUs or move records around. You can simply modify department membership attributes on the user, something the LDAP administrator can do.

Where can I find references on LDAP filter syntax?

Although there are innumerable sites on the internet that cover some aspect of LDAP filter syntax, two examples are:

Customer user filters range from very simple to very complex. Here are two examples. Notice that one customer differentiates by “postalCode” and another uses various “useraccountcontrol” values.

  • (&(&(|(useraccountcontrol=512)(useraccountcontrol=544)(useraccountcontrol=66048))(mail=*.*)(postalCode=FS)))
  • (&(|(useraccountcontrol=512)(useraccountcontrol=544)(useraccountcontrol=66048)(useraccountcontrol=4194816)(useraccountcontrol=4260352))(mail=*.*))

What tools can I use to troubleshoot the LDAP filter for too few or too many users?

We use the command-line tool LDAP search. There are other command line and graphical utilities out there. Please let us know if you have a specific question about setting up your LDAP filter.

How often should I manually synchronize my LDAP configuration?

Since the changes to your LDAP users are applied every day, there’s no need to manually synchronize unless you’ve made changes to your users that you want to see in Office Chat right away.

Can I “Suspend” or “Change Users’ Passwords” in Office Chat when Authenticating through LDAP?

When LDAP is enabled, it controls all users in your domain. Suspending or changing users’ passwords will not affect LDAP users, only those guest users or network users that are not part of your LDAP.

Do LDAP settings overwrite mapped values that user may have changed in Office Chat on Sync?

LDAP, for the most part, is treated as the master record of user data when synchronizing with Office Chat. Mapped user data that users may have changed in Office Chat will be overwritten with their LDAP mapped field when an LDAP sync occurs. So fields like “User Name”, “Email”, “Title” and “Work Landline” that are Office Chat fields will be overwritten by their LDAP mappings.

How do I log in once LDAP is configured?

Users log in to Office Chat using their unique identifier (UID) and LDAP password once LDAP is configured in Office Chat. Passwords are controlled through LDAP so users and admins cannot change passwords from Office Chat but rather passwords must be changed in LDAP.

When and how frequently is AD synchronized with Office Chat?

Office Chat can be set to sync automatically with AD up to once per day or every hour. The sync happens at approximately 1:00 AM Pacific Time. To set autosync for AD:

  1. Go to the “Admin Portal” -> “Single Sign-On” -> “LDAP / AD” page.
  2. If your configuration has already been saved, at the very bottom of the page, place a check in “Auto-sync Office Chat with enterprise AD/LDAP” choose between once every or every hour and click “Save”.


Please take note that the hourly sync will include the following
1. User gets activated/deactivated(if setting enabled).
2. New users get created
3. New groups get created
4. Email change/samaccount change also happens

Once every 24 hours, a full sync will be performed that will include everything.

Can I restrict login based on IP addresses?

Yes, with Office Chat Enterprise plan you can set an IP range for your network to only allow employees to access Office Chat from your office network or from behind a VPN.

To help protect your organization’s data from unauthorized access, you can specify a list of IP addresses from which users can log in. Users outside of the specified login IP ranges cannot access your domain.

To restrict access on a single or on multiple IP ranges refer to the diagrams and steps below:

  1.  Go to the admin portal
  2.  Click on ‘Security’ from the left-hand navigation
  3.  Click on ‘Browser Access’ and navigate to IP range configuration.
  4. Define one or more IP ranges &  click on the “Save Settings” button to register your settings.

IP based Access Browser


While designating IP ranges by following above steps will work on the web, there are a few additional settings you will have to enable to configure the same IP based restriction on Office Chat Desktop Application and Office Chat Mobile applications :

  • To enable IP based access configured in the ‘Browser Access’ section of your admin portal to native desktop and Mac clients as well:
    1) Kindly go to the ‘Admin Portal’ > Click on ‘Security’ from the left-hand navigation
    2) Click on ‘Desktop Access’ and tick on ‘Enable IP based settings’ and click on the ‘Save’ Button.

IP based Access Desktop


  • To enable IP based access configured in the ‘Browser Access’ section of your admin portal to Mobile clients as well:
    1) Kindly go to the ‘Admin Portal’ > Click on ‘Security’ from the left-hand navigation
    2) Click on ‘Mobile Access’ and tick on ‘Enable IP based settings’ and click on the ‘Save’ Button.

IP based Access Mobile

Note: IP ranges between 192.168.0.0 – 192.168.255.255 are not accepted as these are private IP ranges and cannot be used on the internet.

How do I delete a user from Office Chat?

Office Chat domain admin can delete a user from the network.  Deleting the user will permanently delete all private chats the user has had with all other users and all groups that the user has created. Additionally, all chat messages & files posted by the user in groups which the user is a member of would be permanently deleted.

To delete a User from Office Chat network:

1. Login to your Office Chat domain from any web browser
2. Click on the “Admin” tab on the top main menu (Admin Tab is accessible to domain admins only)
3. On the Admin Portal, click on Users tab.
4. Select the checkbox next to the users you want to delete.
5. Click the “User Tools > Delete” menu
Delete A User Office Chat

Kindly check the following video, to delete a user from your Office Chat network:


In case you wish to maintain the chat records of such employees, we recommend deactivating the user instead of deleting the user. Deactivating the user keeps all the content posted by the user intact. This history might be useful to preserve for knowledge & audit purposes. Help article on deactivating users: https://officechat.com/help/how-do-i-deactivate-or-activate-a-user/

What is a Default Group in Office Chat?

Office Chat allows admins to mark one or more groups in the network as ‘default.’ This results in all members of your network to be added to it by default.

New members that are invited into your network in the future are also automatically added to the default group. Members can’t leave a default group. The “All Of Us” group and the new “Admin Announcements” group are examples of pre-shipped default groups in your network.

All these settings & control are available on both Office Chat Business & Enterprise Plans from the admin portal

To Mark a Group as a ‘Default’ group from the Admin Portal, kindly look at the following video:


How can I restrict Users from Inviting others?

Office Chat allows you to enable/disable Users from sending Invites to others. You can control how new users get added to your network. The choices include anyone can invite, anyone can invite but the domain admin needs to approve, lastly only the domain admins can invite. This feature is available on Office Chat Enterprise plan.
Keep in mind the “Moderated” option will notify you or any domain admin of new invitation approvals from the admin portal, no notification is given if a domain admin performs the invitation.

To change the Invite settings for your Office Chat Account, kindly look at the following steps: 

  1.  Login to Admin Portal and navigate to ‘Domain’ tab on the Left-Hand side Navigation menu 
  2. Once on this page, Click on ‘Invite Settings’
  3. Here, you can choose between the following option:
  •   Allowed (Any user can invite other users in the network)
  •   Moderated (Any user can invite, but invitations will require one admin’s approval)
  •   Disallowed (Only you/administrators can invite other users in the network)

4. Once you have selected the desired option, click on ‘Save’ to confirm.

Invite Settings


Kindly note: These settings do not get applied to signups via Google Apps & SAML providers.

Can I Add users who do not have an Email ID?

Office Chat allows you to create accounts in your office chat network without any email address.  

This is a great way to support the following use cases:  

  • If you have employees who don’t have a company email address, and you don’t want to use their personal email address (@gmail / @yahoo, etc.) but need them to be part of the groups created in your office chat network.
  •  If you want to create office chat accounts that represent rooms, stores, reception desk, nurse station, etc. Which don’t have a real email address and perhaps different people in shifts use the rooms/front desk/reception desk, nurse station, etc. and need to communicate in groups.

 To create Office Chat Accounts for users who do not have an Email id, kindly look at the following steps: 

  1) Login to Admin Portal and navigate to ‘Users’ tab on the Left-Hand side Navigation menu 

2) Once on this page, Click on ‘Add Users’ 

3) Here look for the ‘Add using User ID’ tab. 

admin01_1509633387 

4) Under this option, you will be able to add the User’s Full name, User ID and the Initial Password 

5) Click on ‘Create Users’ button to create the user accounts. These Login ids and initial passwords can be used to login to your Office Chat Network