How do I Enable / Disable a device from the Admin Portal

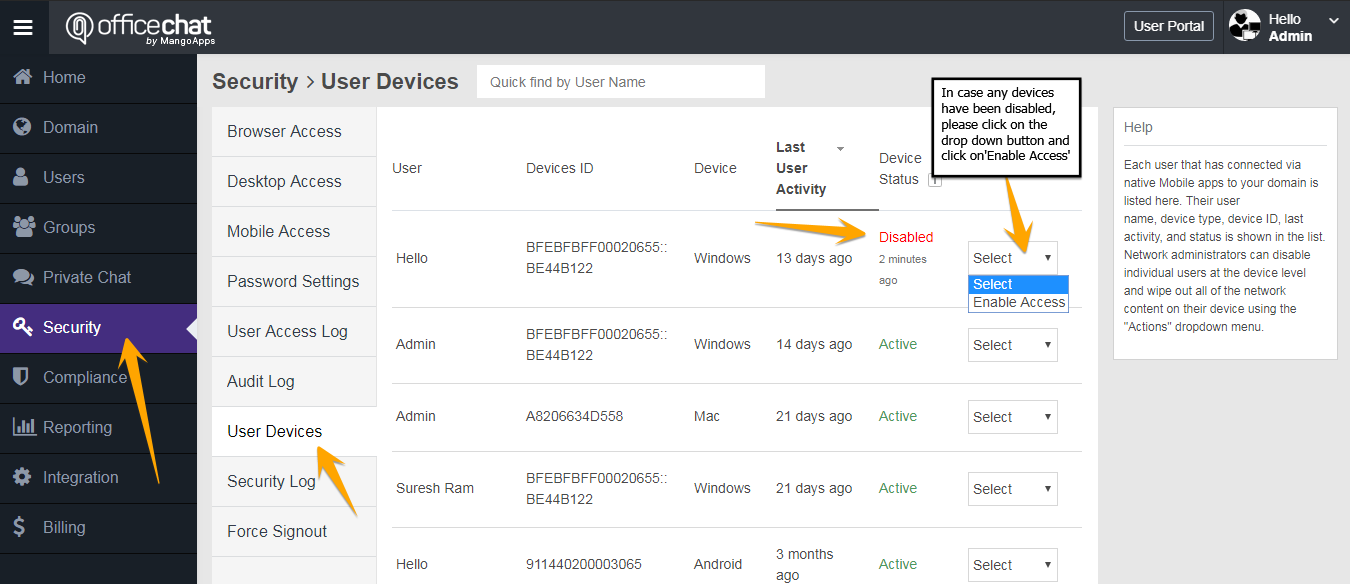
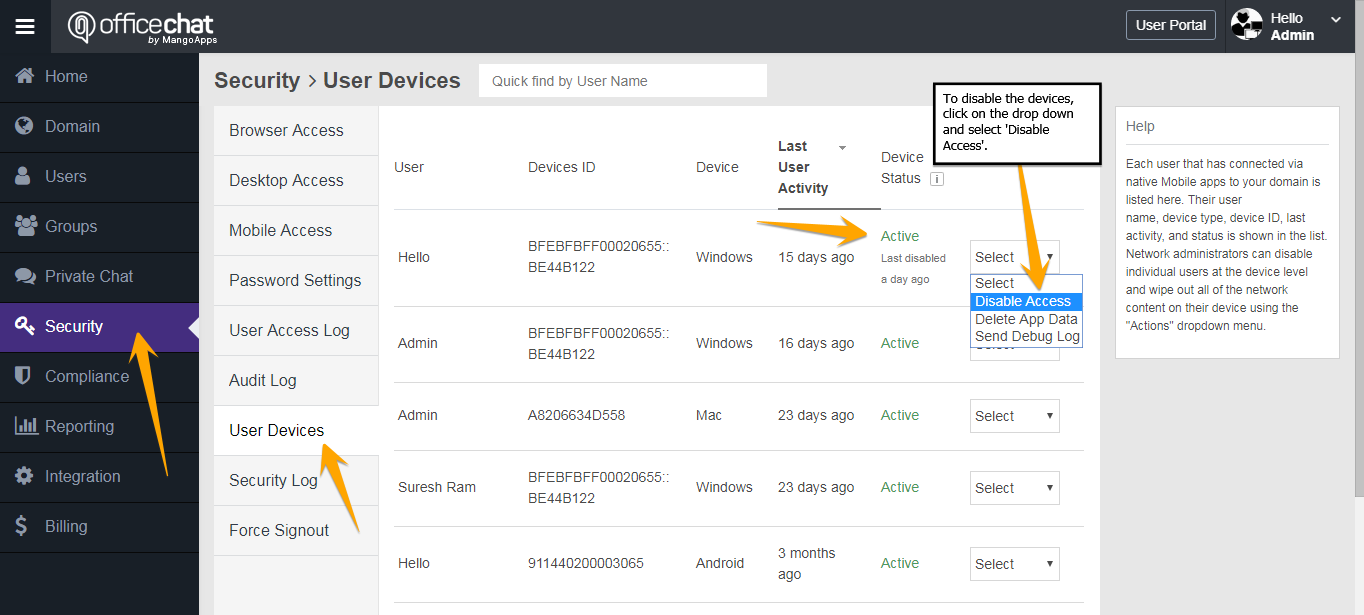
With Office Chat, you as an administrator can easily disable/enable any device that has access to your network. With Office Chat User devices feature, each user that has connected via native Mobile apps to your domain is listed here. Their username, device type, device ID, last activity, and status is shown in this list. Network administrators can disable individual users at the device level and wipe out all of the network content on their device using the “Actions” drop-down menu.

To disable any device from the admin portal:

  1. Login to Admin Portal from the web browser and navigate to ‘Security’ tab on the Left-Hand side Navigation menu
  2. Here Click on the ‘User Devices’ Tab and search for the user whose device has to be disabled.
  3. Once the users’ active devices are listed, please click on the drop-down button and click on ‘Disable Access’

Disable Access


To enable any device from the admin portal:

  1. Login to Admin Portal from the web browser and navigate to ‘Security’ tab on the Left-Hand side Navigation menu
  2. Here Click on the ‘User Devices’ Tab and search for the user whose devices has to be enabled.
  3. If in case there are any disabled devices, please click on the drop-down button and click on ‘Enable Access’

Enable Devices

How to Configure MailChimp with Office Chat

MailChimp is an online email marketing service for managing contacts, sending emails, and tracking results of your teams email campaigns.

To integrate Office Chat with MailChimp:

Step 1:

In your Group, click on Configure Integrations in the Admin Tools. Please note: You need to be the admin to configure MailChimp for your team.

Mail Chimp Configure Integrations


Step 2:

Enable MailChimp in the list of integrations.

Mail Chimp Configure Integrations 2


Please note: If you don’t see MailChimp, please contact your domain administrator to enable it from ‘Admin Portal > Integrations > Services’ page.

Mail Chimp Configure Integrations 3


Step 3:

In the MailChimp settings dialog, click on Authenticate with MailChimp to login into the MailChimp account and authorize Office Chat on MailChimp.

Mail Chimp Configure Integrations 4

Then Select 1 or more of the MailChimp lists from which the events will be posted into this team. You will be required to select a minimum of 1 MailChimp list from the dropdown. Click the Save Settings button when you are done.

Mail Chimp Configure Integrations 5


Setup instructions to follow on MailChimp side

Since Office Chat automatically does the webhook configuration once you have authenticated and connected the Office Chat account to MailChimp, there is no setup required on MailChimp side for this integration to work. It’s that easy!


How do I setup integeration with Slack

In case your organization is already using Slack you can integrate the same inside teams in Office Chat to get real-time notification from Slack to Office Chat and vice-versa.

To integrate Slack with Office Chat:

1)  Ensure Slack is enabled in the Admin Portal. Then proceed with the configurations as shown in the figure below:
Slack 1


2. Navigate to ‘Groups’  and select the group that you want to integrate Slack with. Once you have selected the Group, click on the ‘More Tools’ icon (three dots) and select ‘Configure Integrations’

Slack 2


3. Click “Enable” besides Slack from the list of available integrations and you will be presented with a pop-up to Configure Slack in Office Chat.
Slack 3


4. Here’s a brief on each of the fields to configure the integration:

  • Webhook URL: This is the URL that you will need paste into Slack outgoing webhooks integration, this cannot be modified and is required to be copied and pasted as is in Slack.
  • Customize Name: Choose a username that messages from this integration will be posted as.
  • Authenticate with Slack: Click to authenticate Slack in Office Chat to enable the integration, this is a mandatory step to configure the integration.


5. Go to your Slack team Integrations settings. Open it from Slack app menu or via direct URL https://yourdomain.slack.com/services. Select the Slack Channel you wan to integrate and then the gear along the top and Integration from the drop down.

Slack 5


6. Then create a new Outgoing webhook integration by searching for “Outgoing Webhooks” in the app directory then adding the same by clicking ‘Add Configuration’.

Slack 6


7. Once installed, scroll to “Integration Settings” and paste the Webhook URL from Office Chat into “URL(s)” and Save Settings.
Slack 8


8. Once done, please double check whether the Link is correct. Go back to the project and select Authenticate and Authorize from the following popup.

Slack 9


9. Once Authorized, confirm the success message and Save the Settings.

Slack 10

Now you should receive messages posted in Slack as feeds in Office Chat Group. Let’s take a look to exactly what that experience will look like.

Slack 11

How to Set Two-factor Authentication (2FA) with Office Chat

About Two Factor Authentication

Two factor authentication (2FA) provides a more secure login process because when users try to sign in, they’ll have to provide two pieces of information:

  • The account password.
  • A single-use authorization code generated by a mobile app (e.g. Google Authenticator) OR an email message.

This is similar to a cash withdrawal machine at the bank, which requires both a debit card and a personal identification number (PIN). The difference here is that you’ll have to use a different authorization code every time you sign in, because an authorization code expires after it’s used. The network administrators can enable 2FA for all network users.

NOTES:
  • Two factor authentication is applied to all users (Network & guest) when logging into their Office Chat domain using the default authentication of the mechanism of Office Chat (i.e. email & password).
  • When logging in via Google Apps or other SAML providers this setting would not be applicable.
  • This feature is available to users logging in from Web, Desktop and MAC only.

Enabling Two Factor Authentication

To Activate the feature in Office Chat:

  1. Go to the Admin portal > Security > Browser access page
  2. Scroll to the Two factor authentication settings and choose the type of authentication from the drop-downThere are two different ways to retrieve authentication codes to use during login. You can either:
  • Enable 2FA token via email OR
  • Enable 2FA token via Authenticator app
  1. Set the Authentication validity period
  2. Click Save Settings

How Two Factor Authentication works once enabled:

Login via Web:

Step 1: Users log in with Username and Password

Step 2: User gets a secure code via email or an authenticator app on the mobile as configured by the network admin during set up.

Step 3: The user provides the secure code in the browser to access the account.

Steps to Reset Two Factor Authentication for Users (Admin function)

The domain administrator can reset the 2FA for users in case they lose access to the mobile device they used at the time of 2FA activation.

  1. Go to the admin portal > Users
  2. Select the user by clicking on the checkbox.
  3. Click on “User Tools” from the right side then click “Reset QR code.”
  4. The next time the user logs in, the user can set up 2FA from the beginning, providing a code from the authenticator.

Recommended Authenticator apps

You’ll need to download an authenticator app to your mobile device. The app will be able to scan QR codes and retrieve authentication data for you.

Here are some recommended authenticator apps., you can follow the links to download and install them:

The QR code will be shown next time the user logs in.
For example this is a user logging in from the web browser.

How do I delete a user from Office Chat?

Office Chat domain admin can delete a user from the network.  Deleting the user will permanently delete all private chats the user has had with all other users and all groups that the user has created. Additionally, all chat messages & files posted by the user in groups which the user is a member of would be permanently deleted.

To delete a User from Office Chat network:

1. Login to your Office Chat domain from any web browser
2. Click on the “Admin” tab on the top main menu (Admin Tab is accessible to domain admins only)
3. On the Admin Portal, click on Users tab.
4. Select the checkbox next to the users you want to delete.
5. Click the “User Tools > Delete” menu
Delete A User Office Chat

Kindly check the following video, to delete a user from your Office Chat network:


In case you wish to maintain the chat records of such employees, we recommend deactivating the user instead of deleting the user. Deactivating the user keeps all the content posted by the user intact. This history might be useful to preserve for knowledge & audit purposes. Help article on deactivating users: https://officechat.com/help/how-do-i-deactivate-or-activate-a-user/

What is a Default Group in Office Chat?

Office Chat allows admins to mark one or more groups in the network as ‘default.’ This results in all members of your network to be added to it by default.

New members that are invited into your network in the future are also automatically added to the default group. Members can’t leave a default group. The “All Of Us” group and the new “Admin Announcements” group are examples of pre-shipped default groups in your network.

All these settings & control are available on both Office Chat Business & Enterprise Plans from the admin portal

To Mark a Group as a ‘Default’ group from the Admin Portal, kindly look at the following video:


How can I bulk import Users to my Office Chat network?

This article will show you how to invite people in bulk to your Office Chat network.

If the network admin wants to invite a large number of users to the Office chat portal, then you can do it by using the “Import CSV” feature in Office Chat.

Steps to import users from CSV

I. Creating a CSV file

To invite users by importing them from a CSV file. First, you need to create a CSV file with the first line being the field headings and all subsequent lines being field values for each user to be invited.

Notes on CSV Files

  • It’s recommended that each field is surrounded by quotes. This means that each value must not contain any quotes of their own so please pay close attention to the CSV file must be made accurately and include no quotes for field’s value.
  • For users’ fields that do not have values, there should be nothing between the quotes such as in this example where the user “Will Smith” has no “title” in the 5th column:
    "name","firstname","lastname","email/login","title","mobile","Enabled"
    "Will Smith","Will","Smith","willsmith@gmail.com","","(+91)1234123411","TRUE"
  • Each user must have the same number of fields, even if they are empty, as there are field headings in the CSV file.
  • Description of Enabled flag value:-
    • TRUE- This will activate an existing user if the current status is Deactivated. If the user is not present in the domain, then the user will be created.
    • FALSE – This will deactivate an existing user if the current status is Activate. If the user is not present in the domain, then the user will not be created.
    • – If the Enabled field is left blank, then the user state will not be touched.

The format of the CSV file is below. The first line is the field headers, and subsequent lines are users that will be imported.

“name”,”firstname”,”lastname”,”email/login”,”title”,”mobile”,”manager”,”Enabled”
“Will Smith”,”Will”,”Smith”,”willsmith@gmail.com”,”Director”,”(+91)1234123411″,”johnny_depp@yahoo.com”, “TRUE”
“JohnnyDepp”,”Johnny”,”Depp”,”johnny_depp@yahoo.com”,”Manager”,”(+91)1234123411″,”ashton@yahoo.com”, “FALSE”


II. Importing the CSV file 
Once the CSV file has been created, it is ready to be used to import users to Office Chat. To invite users from your CSV file:

  1. Go to the Admin portal of your Office Chat domain.
  2. Choose “Users” -> “Invite Users” -> “Import Users” tab
  3. Choose between “Skip existing users” or “Update existing users” (Please note that if you select Skip existing users”, then this would skip updating the existing users. It will only add the new users found in the uploaded CSV. If you select “Update existing users”, then it would update all the users already present in the database with new values from the uploaded CSV. Additionally, it will create new users that are found in uploaded CSV.)
  4. You can check or uncheck Additional configurations ” Auto send invites to all newly created users.”
  5. Click the “Choose file” button and navigate to the CSV file you created.
  6. Click the “Import Now” button.
  7. No emails will be sent out to the imported users. Once the import is successful network admin will be notified via email with a link to invite the imported users to Office Chat.

Screenshot:

Bulk Import

Video:


How do I sign a BAA Agreement with Office Chat? 

“BAA” is an acronym for “business associate agreement”. BAAs are hybrid contractual and regulatory instruments, meaning both the parties satisfy HIPAA regulatory requirements. 

To initiate the BAA process a few things will need to occur. 

  1. To get a BAA,  Office Chat will be available only on the Enterprise Annual Plan. You can see the pricing here: https://officechat.com/office-chat-pricing 
  2. We will create a new domain on a special server. You can let us know what name you need, for example: (Current domain / Companyname). The special server runs on a 7-day auto destruct meaning nothing is kept after 7 days. 
  3. Once you have access to your new domain, please invite your staff to this new Office Chat domain. At this point we will suspend the old domain. (This old domain will be deleted once the entire process is completed)
  4. Add your credit card details to the billing area.
  5. We will send you the BAA to sign. Following which we will sign the documents and send you a completed BAA for your records. 
  6. If you have an existing account, we will internally transfer any remaining funds to the new domain or refund them depending on if we are switching plans or what the situation calls for. 

To start, please fill out and email this information to Support@OfficeChat.com with the Subject Line: ‘Office Chat BAA Agreement’ 

  1. Office Chat Domain name: 
  2. Office Chat Admin Email: 
  3. Email of the person to send the BAA agreement (if different than admin): 
  4. A number of user seats needed (you start with 50): 
  5. Your current Office Chat plan is (If Applicable): 
  6. Acknowledge this will be the Enterprise annual plan: $999 for a year (type Yes) :
     

How do I enable logging and report a problem?

Logging helps support diagnose the issue quickly if there’s a problem with Office Chat. To enable it, choose the platform below and follow the steps:

iOS

  1. Tap on “More” and tap on “Settings”
  2. On Settings screen, scroll down and tap on “Reporting Level” and select the reporting level for logs.
  3. By default, reporting level is set to “Errors Only”. It is advisable not to set the reporting level to “None”
  4. Once this is done, please click on More Tab –> Report a Problem. Enter additional information (if any) in the auto-composed email and send the email.

iOS - Logging

The next screen will pull up the report to send, typically the defaults are fine but ensure your recipient information is correct one to use in the “user email:” section.

1522691490_175133

Android

In Office Chat Android, by default, reporting level is set to “Errors Only” and cannot be changed. The steps are mostly the same as iOS seen above. Select More > Report a Problem. as before ensure your recipient information is correct one to use in the “user email:” section.

Android report problems + cacheSend Android mobile logs


Office Chat for Windows

Go to Office Chat Settings –> Preferences –> check the checkbox for “Enable debug logs” and click OK button. Please refer the below video for steps:

Office Chat on Mac

Select Office Chat, now at the top menu bar select Office Chat,
from the drop down select report a problem.

14-05-2016-12-46-02


Once selected an e-mail box will appear with the logs attached.

14-05-2016-12-49-28


MAC OS, an alternative method to send the Logs.

Open the “Go to Folder” menu
1. Open the Finder
2. Go to the Menu Bar and open the “Go” menu.
3. Select the entry “Go to Folder…”

23-08-2016-10-33-27

Enter the path to the Application Support folder.
1. Copy and paste the following path in the the “Go to Folder” text field.

~/Library/Application Support

2. Then click on “Go” to open the folder.

23-08-2016-10-41-47

Next is to locate com.mangoapps.officechat folder and ZIP the log folder and send it to support@mangoapps.com or attach it to an existing ticket.

How do I send Windows client logs to support team?

To send the Office Chat Windows client logs to support:

  1. From the bottom of the Windows client, choose the “Gear” menu (settings icon)
  2. Your email client should open with everything filled in and the logs attached. You can enter the issue description. Once done, send the email.

Please refer this short video which demonstrates sending of logs:


If the email client is not configured, go to Start > Run > type %appdata% > navigate to “Office Chat” folder > Zip the “Logs” folder, attach it to an email and send it to support@officechat.com

Once support receives the logs, you should receive an email confirming they were received and that the team will investigate and fix the issue.