How to Change the Credit Card Information?

The credit card information can be changed by the Office Chat admin for your domain from the Admin Portal. To change your credit card information:

  1. Use a web browser to log into your Office Chat domain
  2. Navigate to the admin portal
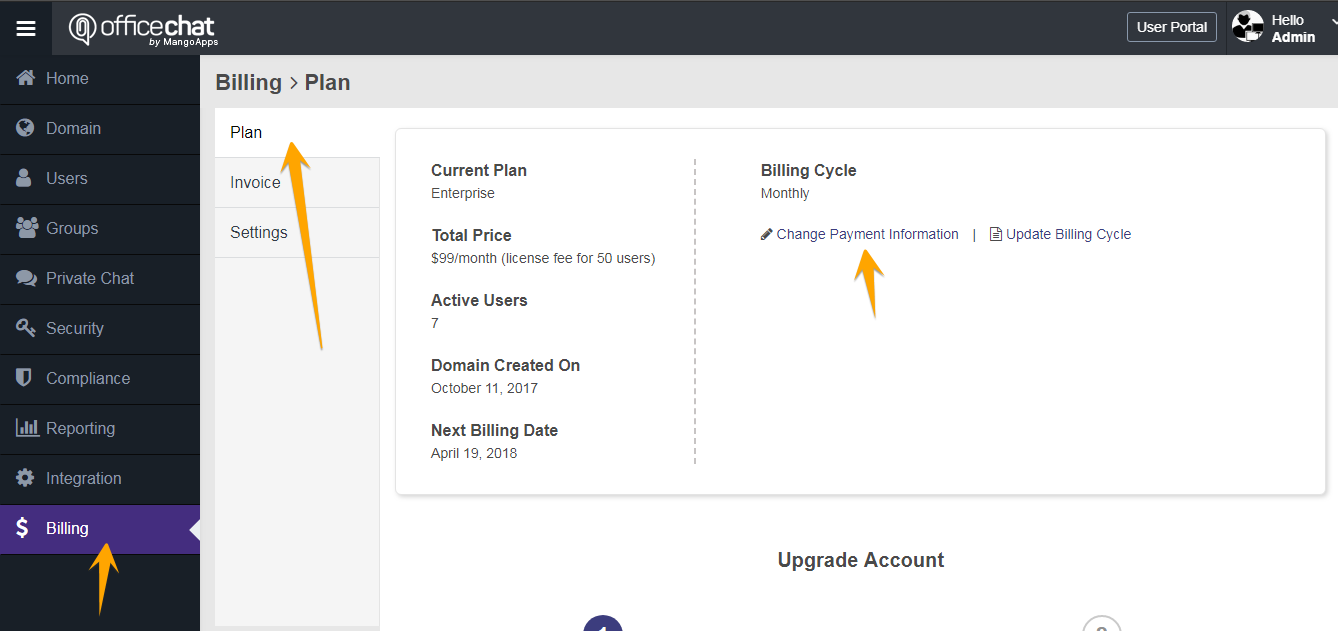
  3. Click on the “Billing” from the left navigation then on the ‘Plan’ Tab.
  4. Here click on ‘Change Payment Information’ and update the new credit card details.
  5. Click “Save” to ensure that all your changes are stored.

Billing address

billing credit card

How can I bulk import Users to my Office Chat network?

This article will show you how to invite people in bulk to your Office Chat network.

If the network admin wants to invite a large number of users to the Office chat portal, then you can do it by using the “Import CSV” feature in Office Chat.

Steps to import users from CSV

I. Creating a CSV file

To invite users by importing them from a CSV file. First, you need to create a CSV file with the first line being the field headings and all subsequent lines being field values for each user to be invited.

Notes on CSV Files

  • It’s recommended that each field is surrounded by quotes. This means that each value must not contain any quotes of their own so please pay close attention to the CSV file must be made accurately and include no quotes for field’s value.
  • For users’ fields that do not have values, there should be nothing between the quotes such as in this example where the user “Will Smith” has no “title” in the 5th column:
    "name","firstname","lastname","email/login","title","mobile","Enabled"
    "Will Smith","Will","Smith","willsmith@gmail.com","","(+91)1234123411","TRUE"
  • Each user must have the same number of fields, even if they are empty, as there are field headings in the CSV file.
  • Description of Enabled flag value:-
    • TRUE- This will activate an existing user if the current status is Deactivated. If the user is not present in the domain, then the user will be created.
    • FALSE – This will deactivate an existing user if the current status is Activate. If the user is not present in the domain, then the user will not be created.
    • – If the Enabled field is left blank, then the user state will not be touched.

The format of the CSV file is below. The first line is the field headers, and subsequent lines are users that will be imported.

“name”,”firstname”,”lastname”,”email/login”,”title”,”mobile”,”manager”,”Enabled”
“Will Smith”,”Will”,”Smith”,”willsmith@gmail.com”,”Director”,”(+91)1234123411″,”johnny_depp@yahoo.com”, “TRUE”
“JohnnyDepp”,”Johnny”,”Depp”,”johnny_depp@yahoo.com”,”Manager”,”(+91)1234123411″,”ashton@yahoo.com”, “FALSE”


II. Importing the CSV file 
Once the CSV file has been created, it is ready to be used to import users to Office Chat. To invite users from your CSV file:

  1. Go to the Admin portal of your Office Chat domain.
  2. Choose “Users” -> “Invite Users” -> “Import Users” tab
  3. Choose between “Skip existing users” or “Update existing users” (Please note that if you select Skip existing users”, then this would skip updating the existing users. It will only add the new users found in the uploaded CSV. If you select “Update existing users”, then it would update all the users already present in the database with new values from the uploaded CSV. Additionally, it will create new users that are found in uploaded CSV.)
  4. You can check or uncheck Additional configurations ” Auto send invites to all newly created users.”
  5. Click the “Choose file” button and navigate to the CSV file you created.
  6. Click the “Import Now” button.
  7. No emails will be sent out to the imported users. Once the import is successful network admin will be notified via email with a link to invite the imported users to Office Chat.

Screenshot:

Bulk Import

Video:


How can I Add Users to my Office Chat network?

Office Chat enables you to add/invite users to your Office Chat Domain in the following ways:

How do I go to the Admin Portal?

If you are a network administrator of your Office Chat domain you should see the Admin” button at the right top next to the Conversations icon; Kindly refer screenshot here:

Admin Portal

In-case you are not the domain Admin, you would not see the “Admin” button as shown above.

How will I get notified about messages when I am offline?

With Office Chat you can setup your users to receive an email digest for new messages when they’re offline for more than 30 mins.

When someone sends you messages on Office Chat and you happen to be offline, you will receive an email. This will help you to keep yourself updated whenever you are not able to be online on your Office Chat network. 

To enable Email Notifications for offline messages: 

  1. Log in to Office Chat in your browser and go to the Admin Portal
  2. On the left hand navigation menu, find and click on ‘Domain
  3. Find and click on ‘Email Settings 
  4. Here, under ‘Notifications‘, you can select to enable Email Notifications for Offline Messages 
  5. Click Save to register your preferred settings 

The video illustrates how you can enable Email digest for Offline Messages:


How can I restrict Users from creating their own Groups?

With Office Chat you can easily restrict Users from creating Groups from the Admin Portal.  

To update Group Creation Settings from the Admin Portal:  

  1. Log in to Office Chat in your browser and go to the Admin Portal
  2. On the left main navigation menu, find and click on “Group” 
  3. Here on the top right hand side of the page, find and click on ‘Manage Settings’ 
  4. You can now select who will be able to create new groups: 
    • Any User 
    • Only Domain Admins 
  1. Click Save to register your preferred settings 

The following video illustrates how you can restrict users from creating groups from the Admin Portal:

How can I restrict Users from deleting conversations with fellow users?

With Office Chat you can control user behavior and restrict Users from deleting conversations with fellow users.

This control is available for Private Chat and Group Chat from the Admin Portal.  

To update Delete Settings in Private Chat or Group Chat:  

  1. Log in to Office Chat in your browser and go to the Admin Portal
  2. On the main navigation menu, find and click on “Compliance” 
  3. Here under ‘Delete Settings’ Tab you can select for Private Chat as well as Group Chat 
  4. For Private Chat, you can select one of the following options:
    • No one can delete messages  
    • User can delete own messages 
  1. For Group Chat, you can select one of the following options:
    • No one can delete messages  
    • Only group admins can delete messages
    • User can delete own messages 
  1. Click Save to register your preferred settings 

You can view the following video to restrict Users from deleting conversations with fellow users: 


How do I signup for the Office Chat Starter Plan?

The Office Chat Starter Plan is designed specifically to enable small teams, businesses and startups to use Office Chat for their organization. If you’re a small business with upto 10 users, go ahead and sign up for the Office Chat Starter Plan 7 day free trial from this page: https://officechat.com/office-chat-pricing

Office Chat Starter plan includes 10 users only at just $25/month or $249/year. Any additional user added will be charged at $3.00/month. The Office Chat Starter Plan has all the features of the Business Plan. 

In case you are interested in Office Chat Starter Plan, get in touch with us at Support@OfficeChat.com or via the Live Chat available on OfficeChat.com

How do I remove a member for the group/team?

You must be a Group Admin to remove a member, Currently, this option is only available from the Desktop client or Mobile app.
From the Mobile app:
1. Tap on the Group
2. Tap on the ‘3 line’ Menu on the top right
3. Tap on Members from the drop-out
4. Tap on the user you wish to remove.
5. Select Remove.

1508530164.507342
From the Desktop Client:
1. Select the Group
2. Select the ‘three Dot’ menu on the group window
3. Select ‘View members’ From the drop-down list
4. Hover over the member and select the X to the right of the name.
5. Select Yes to confirm the removal.


What is Admin Announcements Group?

From OC 2.4 release (released Aug 1st, 2017), all your users would start to see a new group called “Admin Announcements”. Your company’s domain admin would be automatically assigned  the group creator rights  and would have full admin privileges of this group. This group will automatically include all active users in your company and you’ll see a indicator  “new!” against the group name.

This group is designed to share important announcements and news by the domain admin. This group has no reply back capability so there is no distraction and noise caused with everyone replying back in a group chat. If for some reason you don’t need this group, the domain admin can delete it at any time from the admin portal.

AA-Desktop