How do I configure who can send IM?

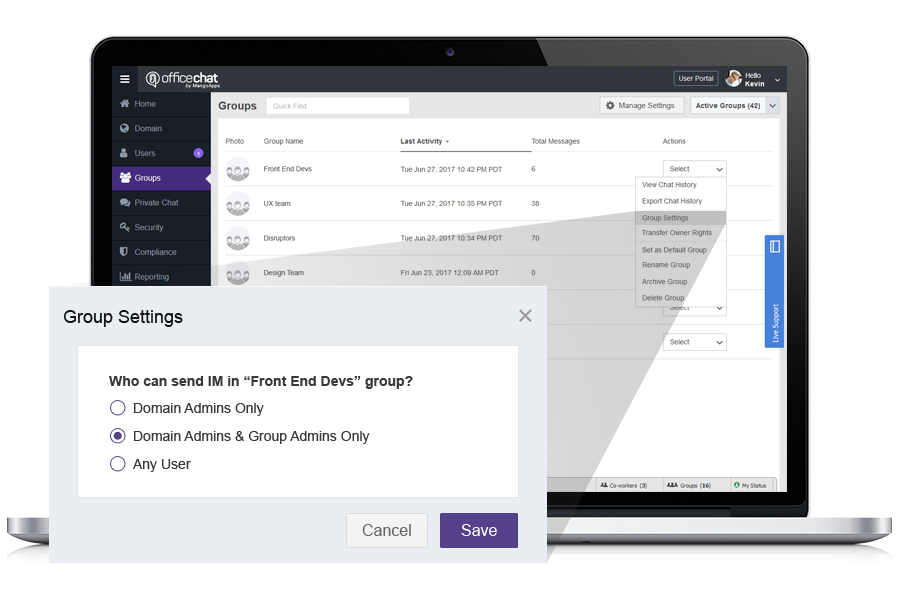
As a domain admin you can control who can send IM in a specific group. The choices you have are

  • Any Member of the Group can Send IM (default)
  • Domain Admins and Group Admins can Send IM
  • Only Domain Admins can Send IM

This is great feature for admins to share important announcements and news in a group. This group has no reply back capability so there is no distraction and noise caused with everyone replying back in a group chat. This feature is available to domain admins on both business & enterprise plans

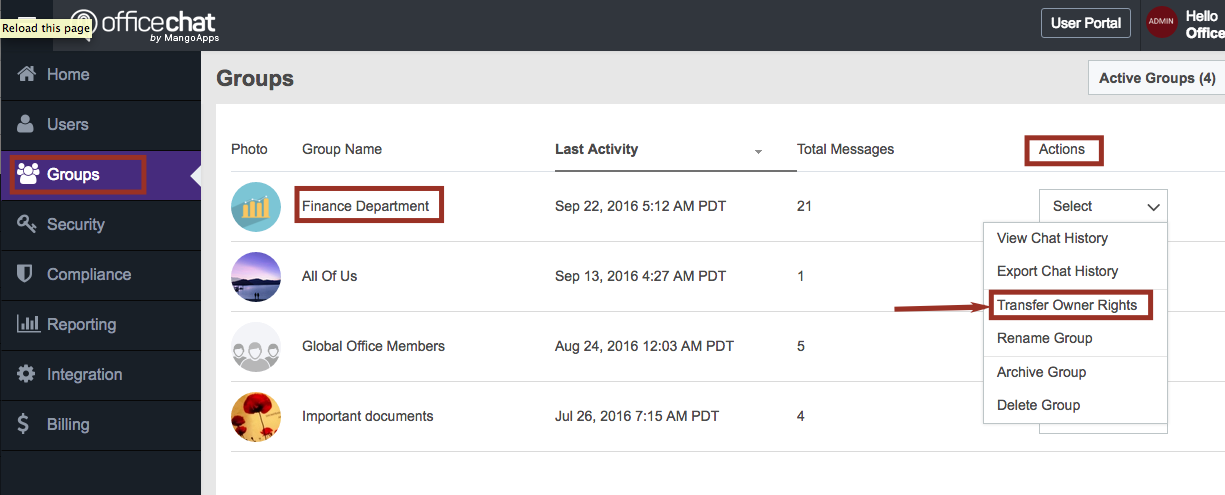
Admins can set this setting from Admin portal > Groups > A Group Action > Group Settings

who-can-send-IM

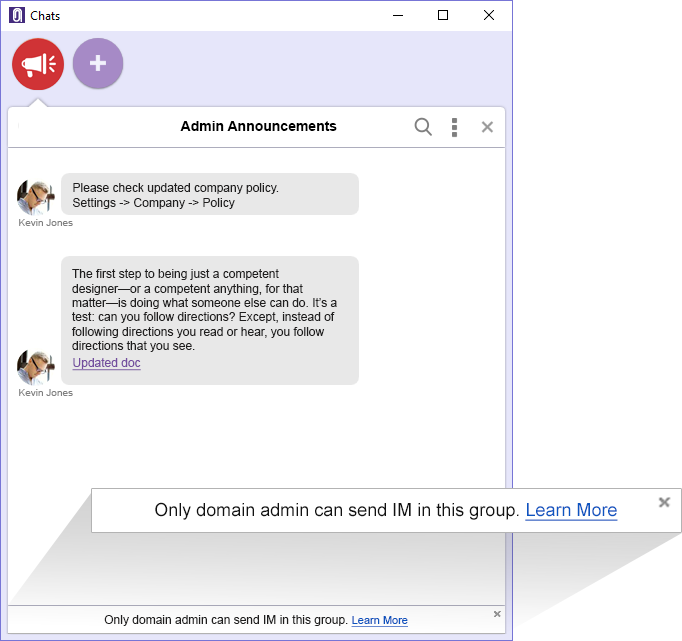
You will see a message like this in the chat window if you’re a group member who can only receive messages but can’t reply back in the group.

who-can-send-IM-desktop

who-can-send-IM-mobile

How do I transfer group ownership rights to another user?

As a domain admin, you can transfer group ownership rights to another member of that group. This can be done via Admin Portal.

Steps for domain admin:

1. Login to Admin Portal and navigate to Groups tab.
2. Expand the ‘Action’ drop-down menu for the group whose ownership rights have to be transferred.
3. Select the option “Transfer Owner Rights”.

transfer-owner-rights

4. On the dialog box, enter the name of the user who is to be made the new owner of that group and click on “Transfer Owner Rights” button.

transfer-2

How do I rename a group via Admin Portal?

A domain admin can rename any group (even if he/she is not a part of it) via Admin Portal. Here are the steps for domain admin:

1. Login to Admin Portal and navigate to Groups tab.
2. Expand the ‘Action’ drop-down menu for the group who is to be renamed.
3. Select the option “Rename Group”.

rename-group

4. On the dialog box, enter the new name and click the button. The group will get renamed.

rename-2

How do I remove administrator rights of a domain admin?

Office Chat needs to have at least 1 domain administrator. A domain admin can be removed as an administrator by another domain admin. Here are the steps for domain admin:

1. As a domain admin, login to Admin Portal and navigate to Users tab.
2. Check the checkbox for the admin user who is to be removed as the domain admin.
3. Then, expand the “User Tools” drop-down menu and select “Remove as Administrator” option.

remove-admin

Once you give confirmation, the selected user becomes a non-admin user.

How do I get my email address changed for Office Chat?

Office Chat has the facility where domain admin can change your email address. The updated email address can then be used for login and further communication. Here are steps for domain admin:

1. As a domain admin, login to Admin Portal and navigate to Users tab.
2. Check the checkbox for the user whose email address is to be changed.
3. Then, expand the “User Tools” drop-down menu and select “Change Email Address” option.

change-email-address

4. Clicking on ‘Change Email Address’ will open a dialog box. Domain admin will enter the new email address and click “Change Email” button.

change-email-address

An email notification will be sent to the new email address. The new email ID will become effective immediately and the current email ID will no longer be valid after the change.

Additionally, please verify the email entered is correct as this will accept improper email format for the purpose to accept placeholder users, a placeholder user is put in the domain for billing purposes and then later converted to an actual user.
The desktop client and mobile app will not accept this improper email format as login credentials.

How do I make someone else as the domain admin?

Office Chat can have multiple domain administrators. The domain creator is by default domain administrator and he/she can set someone else as the domain admin via Admin Portal. Here are the steps for domain admin:

1. As a domain admin, login to Admin Portal and navigate to Users tab.
2. Check the checkbox for the user who is to be made the domain admin.
3. Then, expand the “User Tools” drop-down menu and select “Make administrator” option.

make-admin
Once you give confirmation, the selected user becomes a domain administrator and can enjoy admin privileges.

How can the domain admin reset password of a co-worker via Admin Portal?

If a user forgets his/her Office Chat password, the admin can quickly reset the password and provide it to the user for him/her to login. This process is faster as compared to “Forgot password” process and useful if user has no access to email for that time.

Here is how admin can reset password of its co-workers:

1. As a domain admin, login to Admin Portal and navigate to Users tab
2. Check the checkbox for the user whose password is to be reset
3. Then, expand the “User Tools” drop-down menu and select “Change Email Address” option.

11-10-2016-17-35-09


4. Clicking on ‘Reset Password’ will open a dialog box. Domain admin will enter a temporary password and will share that with that user.

reset-password


Once the domain admin shares the temporary password, user can then use it to login into Office Chat. For security purposes, after that user signs in, he/she will be immediately asked to set a new password. The new password entered will be the password the user will use for subsequent Office Chat logins.

What are the IP addresses and ports that I need to open to allow access to Office Chat servers?

To allow access to Office Chat servers from behind your firewall:

  1. Allow HTTP, HTTPS and TCP access to these three hosts:
    • oc1.officechat.com ( 50.16.226.155 ) 
    • oc2.officechat.com ( 52.20.156.107 )
    • oc3.officechat.com ( 34.239.30.220 )
    • oclegacy.officechat.com (52.207.126.28)
  2. Allow outbound access to ports 80,  443, 5222 and 5223  on the above 3 hosts. 

If you have a BAA with us please instead use this host:  baa.officechat.com (34.230.227.50) with the same ports listed

How do I deactivate or activate a user?

Office Chat domain admin can deactivate a user from the network and reactivate him/her at anytime if needed. A deactivated user will have no access to your Office Chat domain. Prerequisites are to have Business or Enterprise Office Chat plan.

To deactivate a user:

  1. Login to your Office Chat domain from any web browser
  2. Click on the “Admin” tab on the top main menu (Admin Tab is accessible to domain admins only)
  3. On the Admin Portal, click on Users tab.
  4. Select the checkbox next to the users you want to deactivate.
  5. Click the “User Tools > Deactivate” menu item

deactivate-a-user


To deactivate a user from the mobile or desktop/mac client:

  1. Select the user
  2. Go to the user’s info page
  3. Click the “Deactivate” button (Deactivate button is shown to domain admins only)

To reactivate a user:

  1. Login to your Office Chat domain from any web browser.
  2. Click on the “Admin” tab on the top main menu (Admin Tab is accessible to domain admins only).
  3. Click on Users tab.
  4. In the search filter select “Status = Deactivated” and click on Search button.
  5. Check the box next to their name.
  6. Click on the  “User Tools > Activate” menu item.

activate-user


How to Deactivate From the Mobile Device

Go to your Co-workers list and Select the user that needs to be deactivated

1497313906.636205

Next from the message window tap on the 3 dot (lines) in the top right of the screen

1497313906.636149

Next tap on the Settings the Gear Icon below the user

1497313906.636077

The last step is to tap on deactivating and tap on Yes when Prompted. The user will now be deactivated and removed from your active list.

1497313906.635666


How do I change the group/team owner?

Currently, only an office chat network admin can change the group/team owner.

To change group/team owner:
  1. Login to your admin portal interface https://<domain_url>/
  2. Click on the “Teams” tab in the left navigation
  3. Select the team you want to change the owner of using the checkbox
  4. Click the “Actions Drop down > Transfer Owner Rights” menu item.

1

Note that the previous owner will remain as a team member.