New Office Chat 3.0 has been released. This release of Office Chat will be available to accounts who signup on or after Nov 30, 2020. Current Office Chat accounts will continue to be Office Chat 2.X version at this time.
Release Summary
- New 1:1, team messaging & screen-sharing user experience on Windows, Mac & Linux downloadable apps.
- Mobile iOS & Android apps refreshed with do-not-disturb (DND) and custom status features
- Admin web interface gets an update with enhanced remote device management features
Released Details
1. New 1:1, team messaging & screen-sharing user experience
- The new Office Chat Messenger client for desktop is our best and fastest way to chat with co-workers, do 1:1 screen share, 1:1 video calls, get desktop notifications and have it launch right from your tray.
- Platforms supported
- Office Chat Messenger supports the following platforms
- Windows 10 & above (UWP client)
- Windows 7, 8, 8.1 (32 bit & 64 bit versions)
- Mac OSX 10.13 & above
- Linux
- Office Chat Messenger supports the following platforms
- Start a chat
- Start a 1:1 or a team chat from ‘Start a chat’ action on the left panel.
- List of your recent conversations with people and teams will appear below. You can click on a name in the recent conversations list to select them. If you select an item from the recent conversations list, then you can continue the earlier conversation with that person or the team (and you’ll see the chat history) . If you select more than one item, a new chat group with all the selected users will be created (if one doesn’t already exist).
- Clicking on ‘Go’ will add the chat under ‘Open Chats’ on the left panel
- Create a new chat group
- Create a new chat group from the ‘Create a group chat’ action on the left panel
- This allows you to customize the following attributes for the new chat group
- Name of the chat group
- Picture for the chat group
- List of members to be added to the chat group
- Who can add new members? (default: any team member)
- Who can view the members list? (default: any team member)
- Who can send IM? (default: any team member)
- Who can mark IM as important? (default: any team member)
- This would create a new chat group and add the chat under ‘Open Chats’ on the left panel
- Start a 1:1 screen share
- There are 2 ways to share your screen in the new Messenger clients
- From the 1:1 chat window with a person click on the the ‘Start a screen share’ icon (below the message box)
- From the left panel click on the the ‘Start a screen share’ link
- The user will automatically receive a chat message with the link to join the screen share session
- The screen share session comes integrated with computer audio. Participants have the option to mute / unmute the audio connection
- For the other participant to share their screen (if you’re already sharing your screen), you would need to stop sharing your screen. The other participant can then click on “Share my screen” action to start sharing the screen with you.
- Up to a max of 3 participants can be part of one screen sharing session.
- There are 2 ways to share your screen in the new Messenger clients
- Start a 1:1 video & audio call
- From the 1:1 chat window with a person you can start a video & audio call using the ‘Make a call’ action (below the message box)
- The user will automatically receive a chat message with the link to join the video & audio call session
- Participants have the option to mute / unmute the audio connection and also show / hide their video
- Up to a max of 3 participants can be part of one video / audio call
- Open Chats
- This shows a list of chat conversations that you have actively going on. This includes both 1:1 and team active chats
- When you receive a new message one of the following happens
- The new chat item is added to the ‘Open Chats’ list (if not present in the list)
- A unread count (in red) is shown next to it (if the chat is already present in the list)
- New opened chats appear on top of the list
- There is no limit to the number of items that can be present in the “Open Chats”
- You can remove the chat from the open chats list by crossing it out or using the ‘Clear All’ action
- Based on your preference (Preferences > General > Open Chat Options) the open chats list is remembered on logout / re-login
- If a chat is in the ‘Pinned Chats’ list (see below) that it will not appear in the Open Chats list
- Pinned Chats
- This shows a list of chat conversations that you have pinned for quick access. This includes both 1:1 and team pinned chats.
- When you receive a new message in a pinned chat then the unread count (in red) is shown next to it
- New pinned chats appear at the bottom of the list.
- There is no limit to the number of items that can be added to the “Pinned Chats”
- The chat is removed from the pinned chats list when you un-pin it
- Pinned chats are remembered on logout / re-login for you
- The same list of pinned chats is available on the messenger clients and the web portal
- Set Status with Do Not Disturb (DND) option
- All users can now set their availability status from their profile picture (top left corner)
- Set status allows you to
- Select from a pre-configured status values
- Enter your own custom availability status
- Status can be customized to include
- An emoji
- A message of upto 150 chars
- Turn on Do Not Disturb (DnD)
- Auto clear the status after a certain time period
- The availability status set is visible to everyone to see at the following places
- User’s chat window
- User’s office card
- People list
- Open chats & pinned chats list
- When Do Not Disturb option is enabled then
- User will not get notifications for any message sent to them (no sound will play, no toaster will be shown on new message etc)
- User will receive a notification for a message marked as “Important” only
- Other users will see that the user’s presence to be a red icon which indicates that the user is in ‘Do Not Disturb’ mode
- If the auto clear status time interval has been set by the user then on expiry of the time their DnD mode will be cleared also
- When the user has their status set, they get options on the profile picture (top left corner) to
- Clear their status
- Edit their status
- Important & Read Receipt Messages
- You can mark a message as ‘Important’ when sending it.
- Once you mark a message as ‘Important’ then
- Recipient will see an important tag agains it
- Recipient will be required to explicitly mark it as read
- Recipient DND setting will be bypassed / ignored
- In a team, the team admin can decide who can mark a message as required
- Once you mark a message as ‘Important’ then
- You can mark a message to require a ‘Read Receipt’ when sending it
- Once you mark a message with ‘Read Receipt’ required then
- Recipient needs to click on the action ‘View Message’ to see the contents
- Sender gets insights into who had viewed the message
- Any team member can request a read receipt when sending a message
- Once you mark a message with ‘Read Receipt’ required then
- Both these feature are available in 1:1 and team chat messages
- Guest users can also request for read receipt for their messages and send important messages (if team admin has enabled it for all members)
- You can mark a message as ‘Important’ when sending it.
- Files & Rich Media Messages
- Share files as attachments with your message. Files shared in a team are only accessible to members of that team
- Files that are videos, images or audio files render & play inline without any additional software installation needed (with additional options to download & view on web)
- Consolidated list of shared files in a chat is also available for easy access
- People List
- People list shows the list of people in your domain that you follow
- You can use the search to find any person in the domain (including users you don’t follow & guest users)
- The list of users can be ordered by
- Presence (online on top)
- Name
- Recent Activity
- Clicking on a person will open the chat, fetch the chat history with them and add the chat to opened chats list
- Against each person the last badge / level they have received is shown (if the levels & badges module is enabled)
- Team List
- Teams list shows the list of teams in your domain that you are a member of
- You can use the search to find any team in the list quickly
- The list of teams can be ordered by
- Activity (team with recent activity shows on top)
- Name
- Clicking on a team will open the chat window, fetch the chat history in the team and add the chat to opened chats list
- Against each team the number of members in the team is shown
- Emoji & GIF Support
- Brighten up your conversations with emojis and GIFs
- Scroll and browse the list of emoji and GIFs to find the perfect emoji or GIF
- Click on your chosen emoji or GIF to add it to your message.
- Unread Chats
- Unread chats shows a list of 1:1 and team chats that you haven’t read yet
- Clicking on the chat will open the chat window and will remove the chat from unread chats list
- When there are unread chats, you would see a count on the unread chats icon
- When the app is in the background a new chat messages is received there is a green strip on the top which tells you have unread chat messages
- You can mark a chat as read by clicking in the ‘new’ icon next to the message without opening the chat window.
- Profile Photo & Office Card
- Clicking on your profile photo shows a list of actions including ability to changing the profile photo, visit your full profile in the web portal
- Clicking on the photo of a user in the chat window opens the office card for the user.
- From the office card,
- You can make a call or start a screen share directly from it
- You can also send a message from it without having to launch the chat window
- User Preferences
- User has a number of preference settings to personalize their individual experience with the messenger client.
- These preference settings include
- General preferences
- Customize your ‘Open chats’ & Start client experience
- Customize your default download location for files you download
- Customize your toaster for chat & presence/status changes
- Auto launch messenger on desktop/mac startup
- Screen share preferences
- Auto join a screen share session when you receive a request to join
- Mute microphone when you join a screen share session
- Automatically copy the URL to share when you start a screen share
- Connection preference
- Ability to configure your proxy settings
- General preferences
- Search
- Search action is available in each chat window (both 1:1 & team)
- At this time clicking on it the user is taken to the web portal chat module to perform the search
- Enterprise Ready
- Messenger clients come with in-built enterprise features. These include
- Single Sign On (SSO) – You can login into the messenger client using your company’s SSO provider configured in Office Chat
- Auto/Silent Upgrades – The client will notify you whenever there is a new version available and will automatically upgrade to it when you are not active in the client.
- Proxy Support – Many companies requires all internet access from employee desktops to be via the company proxy. Messenger clients support this model
- Encrypted – All messages sent & received by Messenger clients are over SSL / TLS 1.2 protocol
- Technical Support – The messenger clients come with an action to ‘Report a problem’ which automatically sends all the information the technical support team needs to root cause & address the issue you may be facing.

2. Mobile iOS & Android apps new features
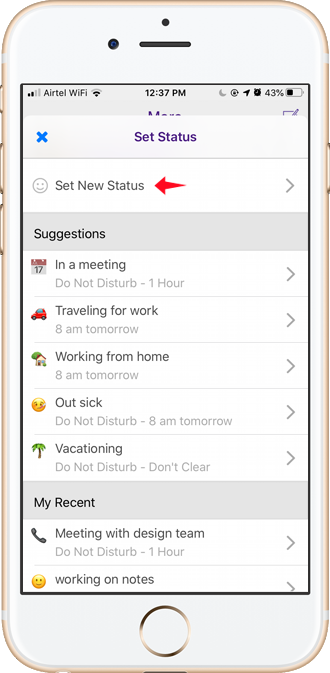
- Users can set custom status with emojis now. Optionally they can set an auto expiry time for which the status is valid.
- Users can use the Do Not Disturb (DND( feature to not receive notifications and not to play sound on new message. This feature is great to use when in a meeting / classroom etc.
3. Admin web interface new updates
- Retire device is a way to clean up devices entries when a device is no more connecting to the domain.
- This action will delete the downloaded app data
- It will also remove the device entry from the remote device mgmt. list
- This option is useful when the employee leaves the company or the device is lost and so the device no longer needs to be managed

 Built for Business: Office Chat premium gives company admins a web-based admin portal with full administration control to: manage users, teams, messages, SSO integration with company's active directory, the usage and engagement dashboard, and email support 24x7.
 Email Interoperability: Office Chat allows you to send a message to anyone in your company. Users without the Office Chat app installed on their phone or desktop can participate in conversations via email.
 Available on Mobile, Desktop, and Mac: Office Chat is the only business messaging solution today that can get everyone in the company on board. It connects your mobile workforce using iPhone, iPad, or Android along with workers using Windows Desktop or Mac.