Archives for December 2017

What is a Default Group in Office Chat?

Office Chat allows admins to mark one or more groups in the network as ‘default.’ This results in all members of your network to be added to it by default.

New members that are invited into your network in the future are also automatically added to the default group. Members can’t leave a default group. The “All Of Us” group and the new “Admin Announcements” group are examples of pre-shipped default groups in your network.

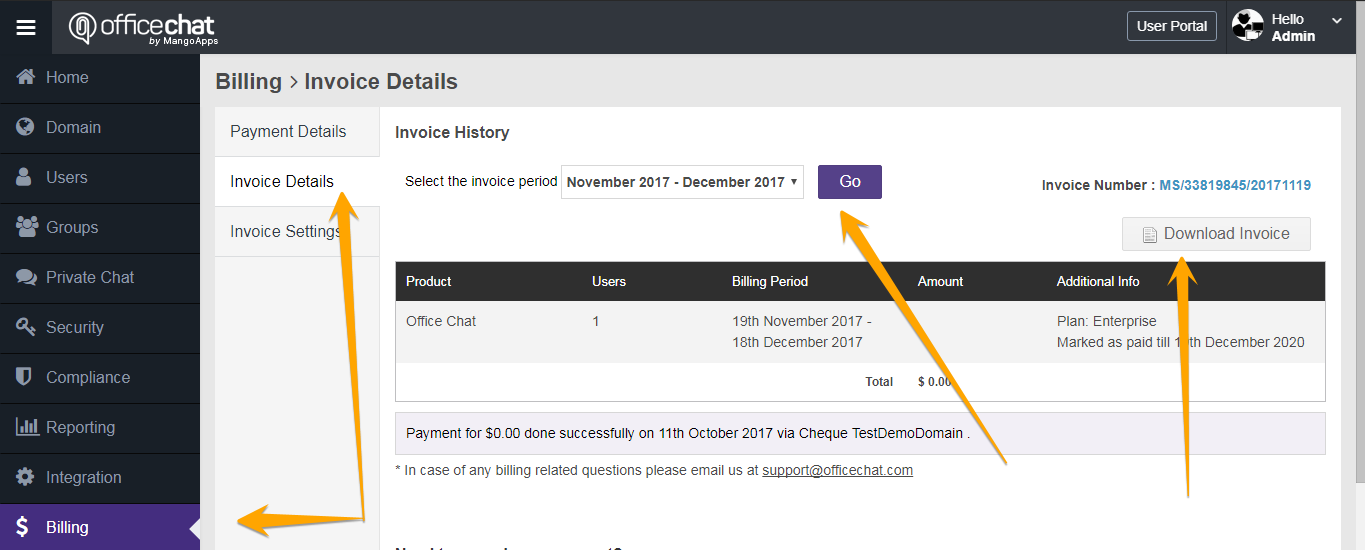
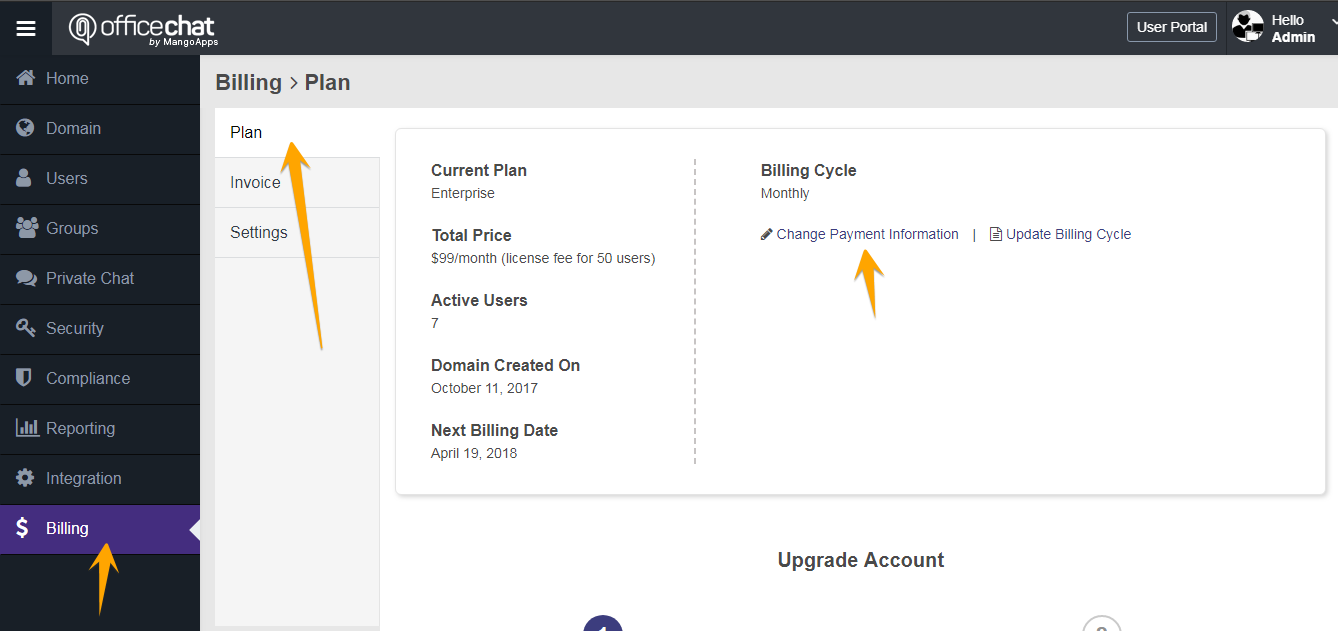
All these settings & control are available on both Office Chat Business & Enterprise Plans from the admin portal

To Mark a Group as a ‘Default’ group from the Admin Portal, kindly look at the following video:


How can I download the Invoice for my Office Chat Account

To download the Invoice for Office Chat Account:

  1. Sign in to Office Chat on the Web then navigate to the Admin portal
  2. Click on “Billing” from the left-hand navigation and then on ‘Invoice Details.’
  3. Select the period for which you need to download the Invoice for from the drop-down menu and click on ‘Go.’
  4. Click on ‘Download Invoice’ to download the Invoice.

Download Invoice

Invoices take one to three days to generate after a payment is made.

How can I restrict Users from Inviting others?

Office Chat allows you to enable/disable Users from sending Invites to others. You can control how new users get added to your network. The choices include anyone can invite, anyone can invite but the domain admin needs to approve, lastly only the domain admins can invite. This feature is available on Office Chat Enterprise plan.
Keep in mind the “Moderated” option will notify you or any domain admin of new invitation approvals from the admin portal, no notification is given if a domain admin performs the invitation.

To change the Invite settings for your Office Chat Account, kindly look at the following steps: 

  1.  Login to Admin Portal and navigate to ‘Domain’ tab on the Left-Hand side Navigation menu 
  2. Once on this page, Click on ‘Invite Settings’
  3. Here, you can choose between the following option:
  •   Allowed (Any user can invite other users in the network)
  •   Moderated (Any user can invite, but invitations will require one admin’s approval)
  •   Disallowed (Only you/administrators can invite other users in the network)

4. Once you have selected the desired option, click on ‘Save’ to confirm.

Invite Settings


Kindly note: These settings do not get applied to signups via Google Apps & SAML providers.

Can I Add users who do not have an Email ID?

Office Chat allows you to create accounts in your office chat network without any email address.  

This is a great way to support the following use cases:  

  • If you have employees who don’t have a company email address, and you don’t want to use their personal email address (@gmail / @yahoo, etc.) but need them to be part of the groups created in your office chat network.
  •  If you want to create office chat accounts that represent rooms, stores, reception desk, nurse station, etc. Which don’t have a real email address and perhaps different people in shifts use the rooms/front desk/reception desk, nurse station, etc. and need to communicate in groups.

 To create Office Chat Accounts for users who do not have an Email id, kindly look at the following steps: 

  1) Login to Admin Portal and navigate to ‘Users’ tab on the Left-Hand side Navigation menu 

2) Once on this page, Click on ‘Add Users’ 

3) Here look for the ‘Add using User ID’ tab. 

admin01_1509633387 

4) Under this option, you will be able to add the User’s Full name, User ID and the Initial Password 

5) Click on ‘Create Users’ button to create the user accounts. These Login ids and initial passwords can be used to login to your Office Chat Network 

How to Change the Credit Card Information?

The credit card information can be changed by the Office Chat admin for your domain from the Admin Portal. To change your credit card information:

  1. Use a web browser to log into your Office Chat domain
  2. Navigate to the admin portal
  3. Click on the “Billing” from the left navigation then on the ‘Plan’ Tab.
  4. Here click on ‘Change Payment Information’ and update the new credit card details.
  5. Click “Save” to ensure that all your changes are stored.

Billing address

billing credit card

Can Office Chat support Languages other than English?

Office Chat can be used to communicate in languages other than English. For this, the User will have to add their preferred language to the keyboard settings.

The language of your keyboard layout controls the characters that appear on your screen when you type. After you enable the keyboard layout for two or more languages in the Windows operating system, you can use the Language bar to switch between languages that use different keyboard layouts. By using the different layouts, you can type all the characters in the language that you choose.

If the user changes the keyboard > language settings and type in the selected language, those messages will be sent/received to and fro in the chosen language.

Kindly check the following video which Illustrates typing in languages other than English:

How can I bulk import Users to my Office Chat network?

This article will show you how to invite people in bulk to your Office Chat network.

If the network admin wants to invite a large number of users to the Office chat portal, then you can do it by using the “Import CSV” feature in Office Chat.

Steps to import users from CSV

I. Creating a CSV file

To invite users by importing them from a CSV file. First, you need to create a CSV file with the first line being the field headings and all subsequent lines being field values for each user to be invited.

Notes on CSV Files

  • It’s recommended that each field is surrounded by quotes. This means that each value must not contain any quotes of their own so please pay close attention to the CSV file must be made accurately and include no quotes for field’s value.
  • For users’ fields that do not have values, there should be nothing between the quotes such as in this example where the user “Will Smith” has no “title” in the 5th column:
    "name","firstname","lastname","email/login","title","mobile","Enabled"
    "Will Smith","Will","Smith","willsmith@gmail.com","","(+91)1234123411","TRUE"
  • Each user must have the same number of fields, even if they are empty, as there are field headings in the CSV file.
  • Description of Enabled flag value:-
    • TRUE- This will activate an existing user if the current status is Deactivated. If the user is not present in the domain, then the user will be created.
    • FALSE – This will deactivate an existing user if the current status is Activate. If the user is not present in the domain, then the user will not be created.
    • – If the Enabled field is left blank, then the user state will not be touched.

The format of the CSV file is below. The first line is the field headers, and subsequent lines are users that will be imported.

“name”,”firstname”,”lastname”,”email/login”,”title”,”mobile”,”manager”,”Enabled”
“Will Smith”,”Will”,”Smith”,”willsmith@gmail.com”,”Director”,”(+91)1234123411″,”johnny_depp@yahoo.com”, “TRUE”
“JohnnyDepp”,”Johnny”,”Depp”,”johnny_depp@yahoo.com”,”Manager”,”(+91)1234123411″,”ashton@yahoo.com”, “FALSE”


II. Importing the CSV file 
Once the CSV file has been created, it is ready to be used to import users to Office Chat. To invite users from your CSV file:

  1. Go to the Admin portal of your Office Chat domain.
  2. Choose “Users” -> “Invite Users” -> “Import Users” tab
  3. Choose between “Skip existing users” or “Update existing users” (Please note that if you select Skip existing users”, then this would skip updating the existing users. It will only add the new users found in the uploaded CSV. If you select “Update existing users”, then it would update all the users already present in the database with new values from the uploaded CSV. Additionally, it will create new users that are found in uploaded CSV.)
  4. You can check or uncheck Additional configurations ” Auto send invites to all newly created users.”
  5. Click the “Choose file” button and navigate to the CSV file you created.
  6. Click the “Import Now” button.
  7. No emails will be sent out to the imported users. Once the import is successful network admin will be notified via email with a link to invite the imported users to Office Chat.

Screenshot:

Bulk Import

Video: