Office Chat is an Instant Messaging Service for small and medium-sized businesses. Office Chat is just like texting, but it works on both your desktop computer and mobile phone. This allows you to Instantly reach everyone in your company, whether you are in the office or out in the field. Please watch this quick 90-second video to learn more.
How do I start a new group on office chat?
May 17, 2016 by
Concepts
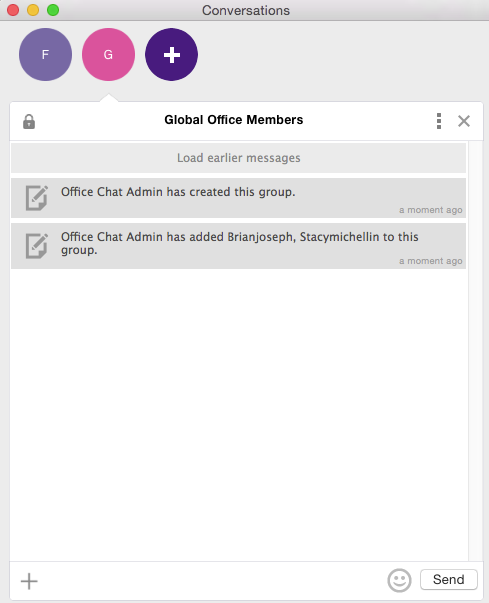
- Groups in Office Chat are group conversations between 3 or more participants (including yourself)
- A group can be renamed to a name that you choose indicating it’s purpose. Any member can rename the group.
- A group can have a picture associated with it that represent’s it. Any member can set the group picture.
- Groups show up in your “Conversations” and “Co-workers & Groups” tabs for easy access.
Office Chat for Windows:
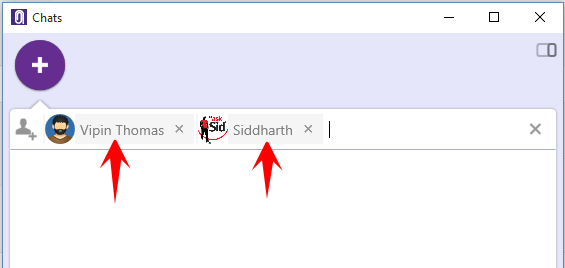
The same compose icon can be used to start both 1-0-1 and Group Chat. Simply insert multiple co-workers’ names/email IDs in the recipient text area and send a message to start a Group Chat.
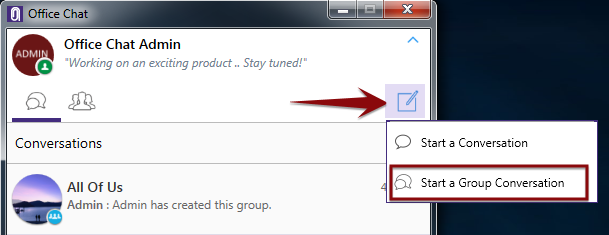
A pop up help message will come up informing that group chat can also be started with a normal chat window. Click “OK”
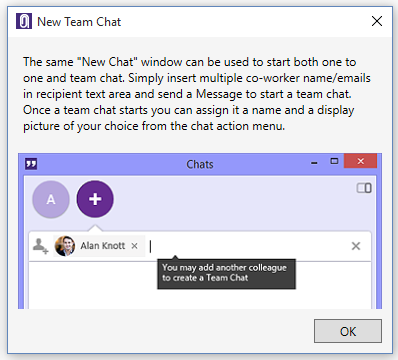
A new chat window will open. Start typing names of your co-workers or email addresses on the top. Once done, enter a message. The group will get created. It’s that simple!
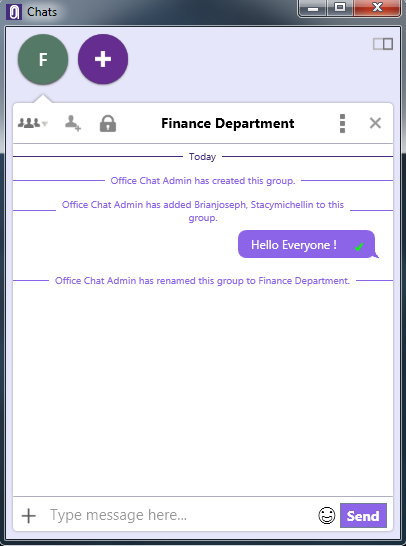
By default, the group name will show up with the participants name. Any group member can rename it from Chat Action menu.
Office Chat on Mac
The same compose icon can be used to start both 1-0-1 and Group Chat. Simply insert multiple co-workers’ names/email IDs in the recipient text area and send a message to start a Group Chat.

A new chat window will open. Start typing names of your co-workers or email addresses on the top. Once done, set a group name and hit the “Create” button. The group will get created. It’s that simple!
Office Chat on Android
Click on the pencil icon to start a chat
Select the Co-workers, groups and phone contacts with whom you wish you create the group. You can also type email addresses of the users you wish to include in the group.
Once you select more than one recipient, the app will give you the option to name this group. Set the name and click “Start” button. Group will get created. It’s that simple!

Office Chat on iOS
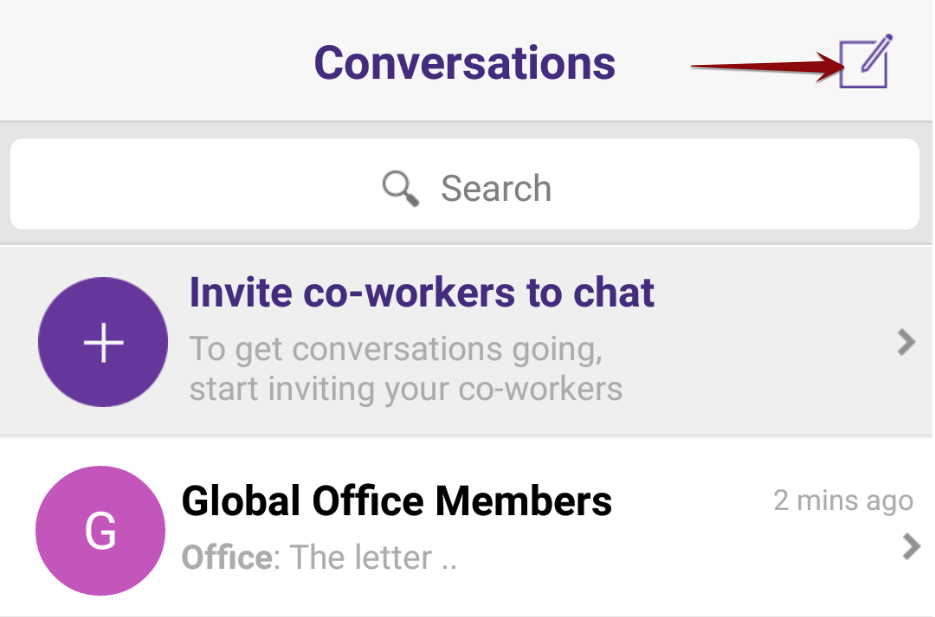
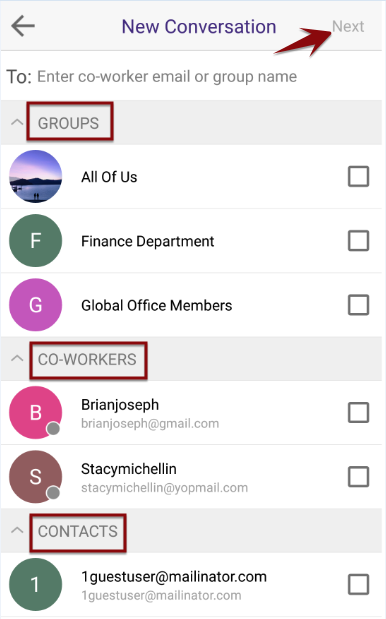
Click on the pencil icon to start a chat

Select the Co-workers, groups and phone contacts with whom you wish you create the group. You can also type email addresses of the users you wish to include in the group.
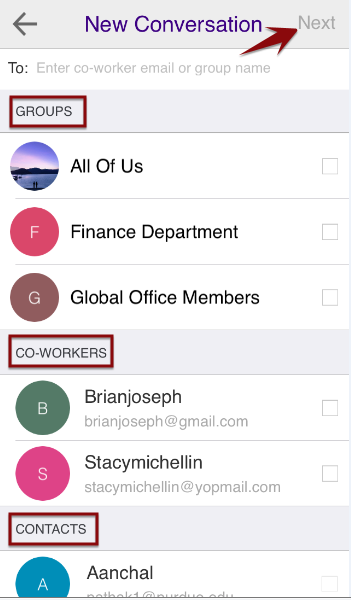
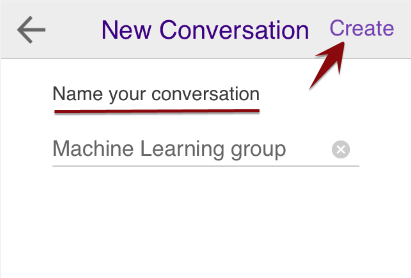
Once you select more than one recipient, the app will give you the option to name this as group. Set the name and click “Create” button. Group will get created. It’s that simple!
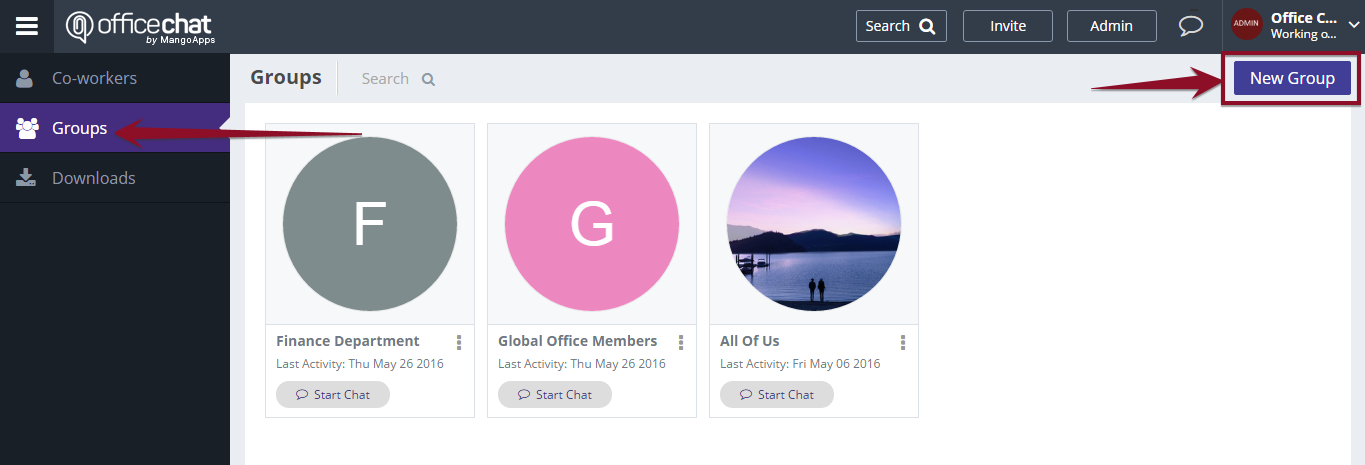
Office Chat on Web
Click on “Groups” tab on LHS. On the groups screen, click on “New Group button”
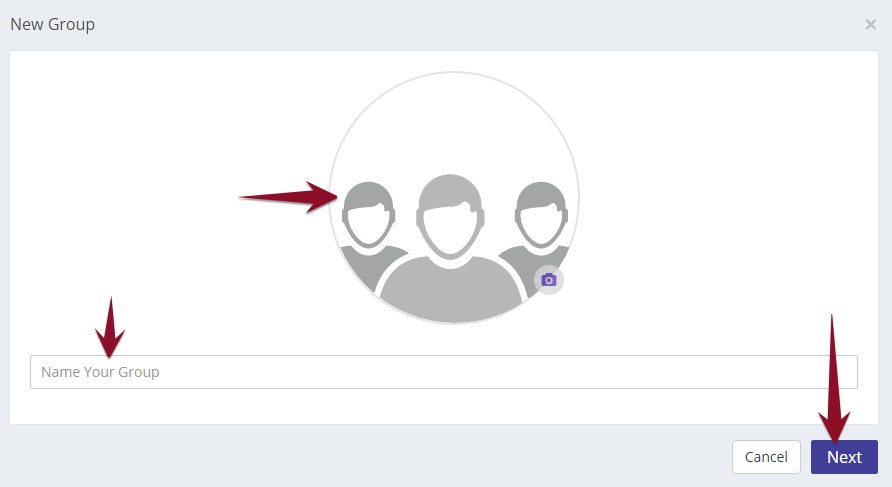
On the next screen, enter a name for the group (mandatory) and a group picture (optional). Click Next button.
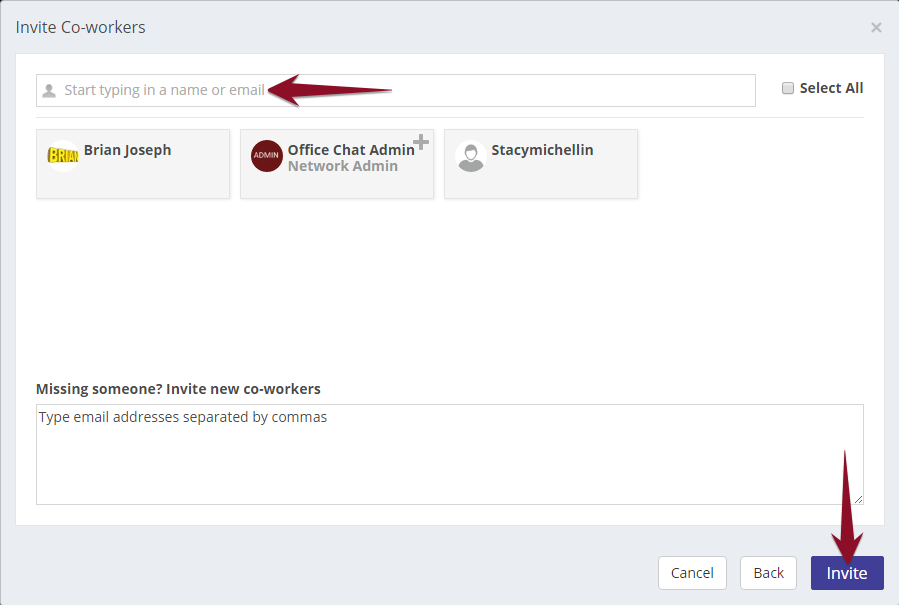
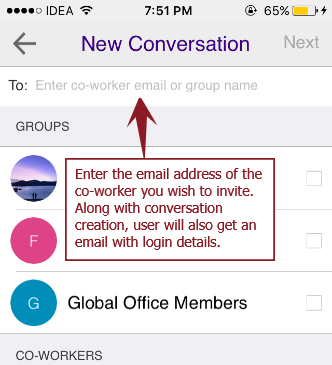
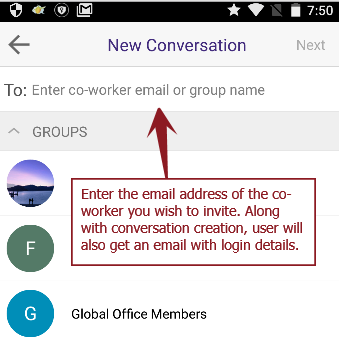
On the next screen, enter the email addresses of co-workers or select them from the list whom you wish to invite to the group. Click Invite button. The group will get created.
How to Manage Groups as the Office Chat Admin?
Please review this video.
How do I enable or disable hyper real time messaging?
October 29, 2015 by
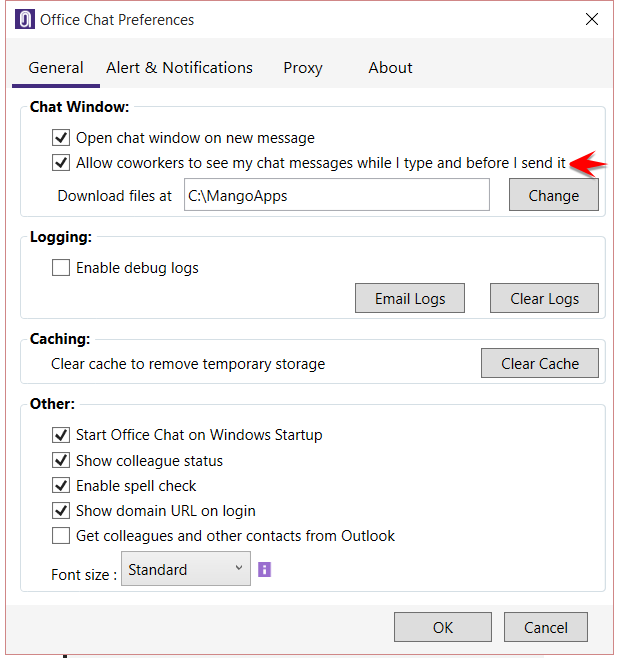
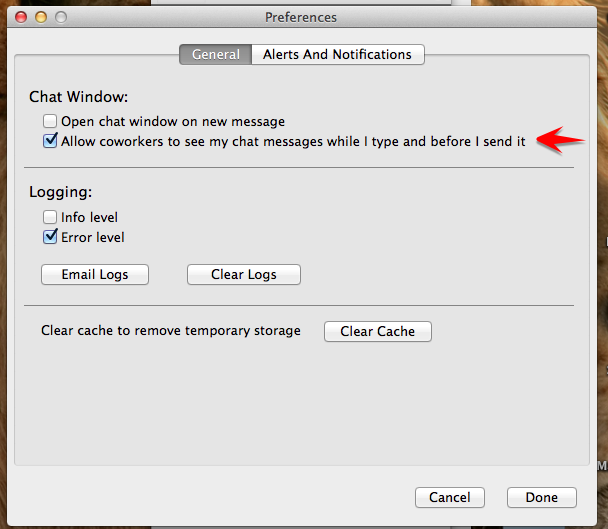
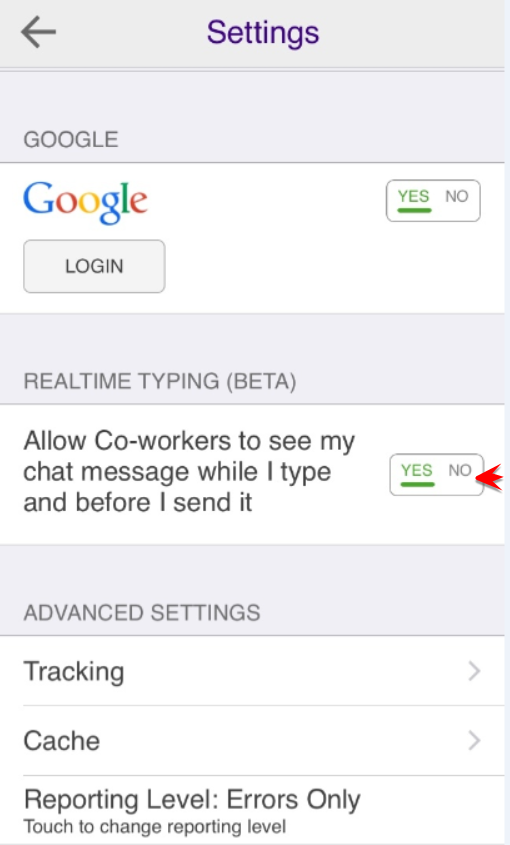
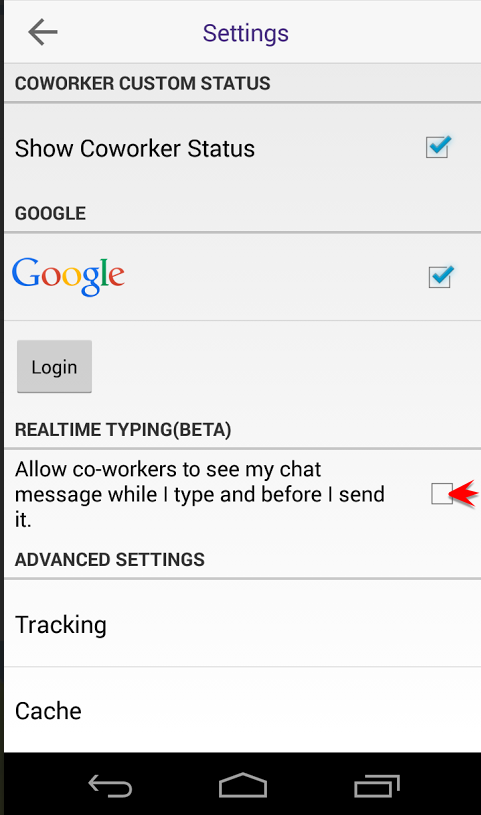
Hyper real time messaging allows your colleagues to see the messages you are typing character by character even without actually sending them. Can be helpful in cases when you are you’re sharing some confidential information or want to keep certain messages off-the-record.
Note:
- By default Hyper real time chat setting is always disabled.
- This setting is driven from the device where Office Chat is installed, e.g. if you enable the setting from Office Chat on Android and you login from Office Chat on Windows the setting will not be enabled for Windows but will only be available on the particular Android device when you enabled the setting.
- Hyper real time is currently not available on the browsers and is limited to only native apps (i.e. Mac, Windows, Android & iOS)
You can enable or disable the setting for hyper real time messages from the Office Chat app on the respective device, refer screenshots below;
Windows
Launch Office Chat for Windows then click on the Setting Gear or Preferences by right clicking Office Chat from the Taskbar
Mac
Launch Office Chat for Mac then click on the Settings Gear.
Office Chat on iOS (iPhone, iPod & iPad)
Launch Office Chat on your iOS device, click on More then Settings
 Office Chat on Android
Launch Office Chat on your Android device, click on More then Settings
How do I invite my contacts & coworkers from my phone’s address book?
August 13, 2014 by
To invite contacts from your phone’s address book:
Android
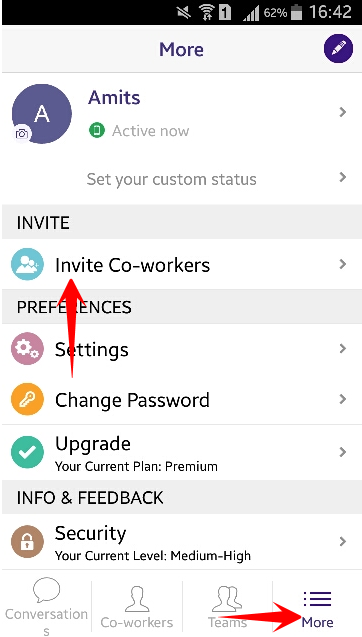
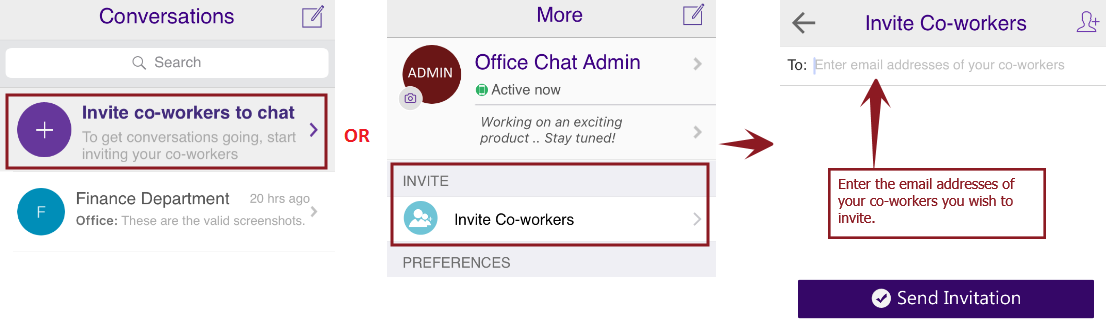
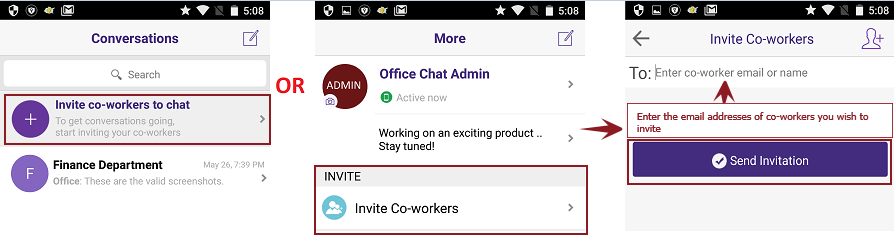
- From the “Messenger” screen, choose the “Invite Coworkers to Chat” item at the top of the list:
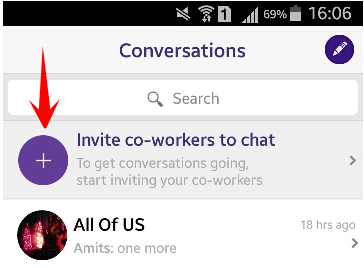
Additionally, a user can click on “More” button at the bottom and select “Invite Co-workers
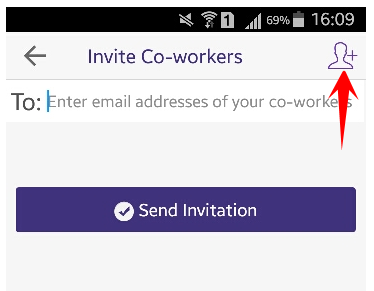
2. On the “Invite Coworkers” screen, choose the “Add Colleagues” button on the top-right of the screen:
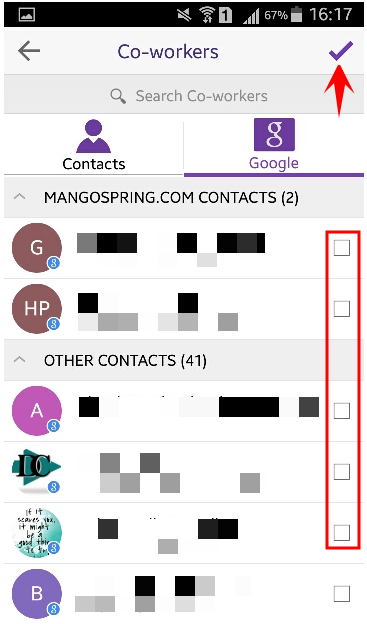
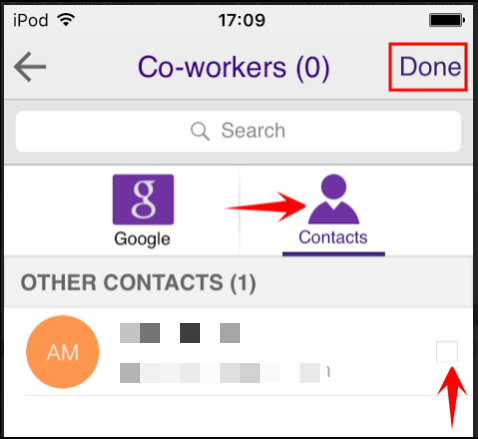
3. Check the boxes next to the contacts and click on the “Check Mark” on the top right corner.
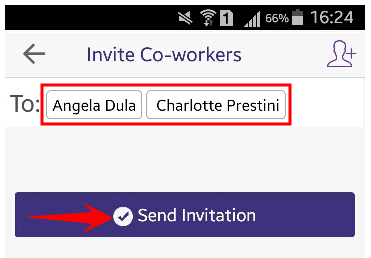
4. The contact’s names will appear in the “To” field. Click “Send Invitation”
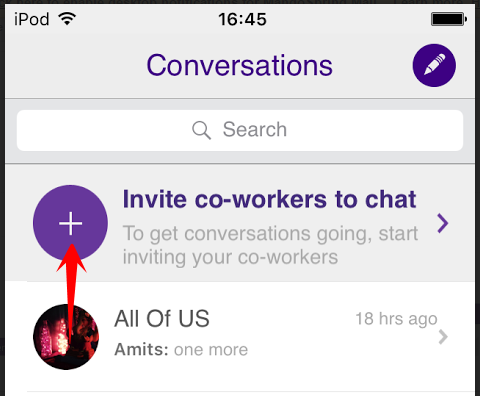
iOS
- From the “Messenger” screen, choose the “Invite Coworkers to Chat” item at the top of the list:
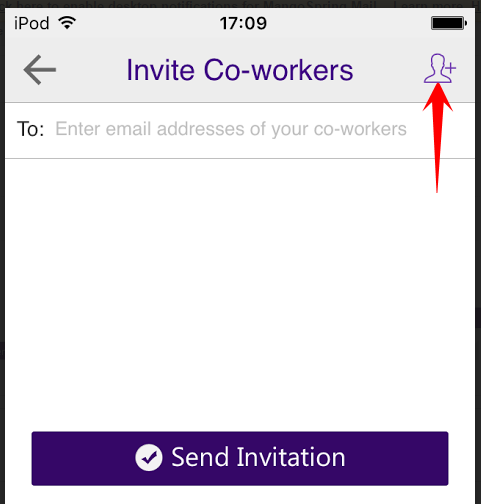
- On the “Invite Coworkers” screen, choose the “Add Colleagues” button on the top-right of the screen:
- On the “Coworkers” screen, choose the “Contacts” icon:
- If you get an error such as the following, go to “Privacy Settings” -> “Contacts” in the iOS “Settings” menu.

- To allow Office Chat access to your contacts list, turn the switch to “On” in “Privacy Settings” -> “Contacts” of the iOS “Settings” menu.

The screens in this article were freely produced using TinyTake by MangoApps.
How do I add or invite new users?
August 8, 2014 by
Anyone with an email address can be invited into your Office Chat network. You don’t need to exchange your personal phone numbers.
Option 1: Invite a new user by typing the email address in the “To List”
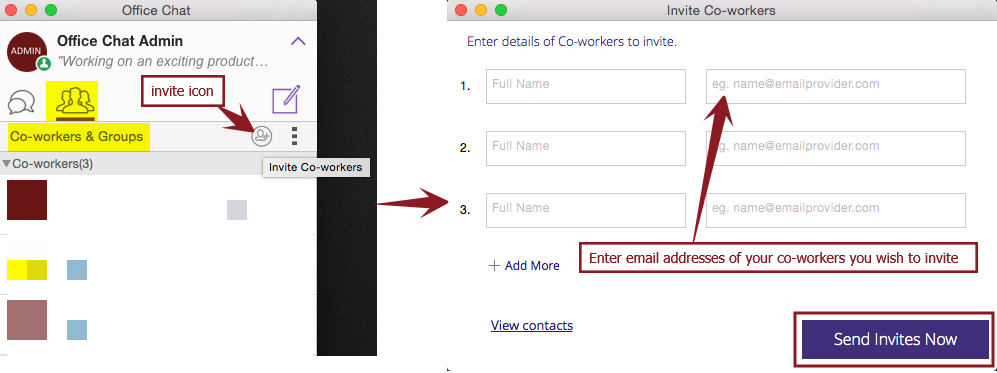
Click on the “Invite” menu item in any of the office chat clients. Enter valid email addresses to invite and click on send the invitation button. Invited users will receive an email with sign in instructions on how to login into your network
Office Chat for Windows
Office Chat for iOS
Office Chat for Android
Office Chat for Mac
Office Chat for Web
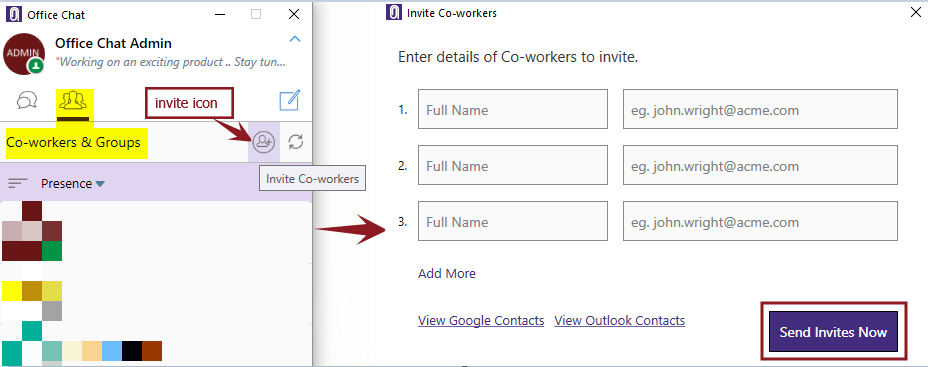
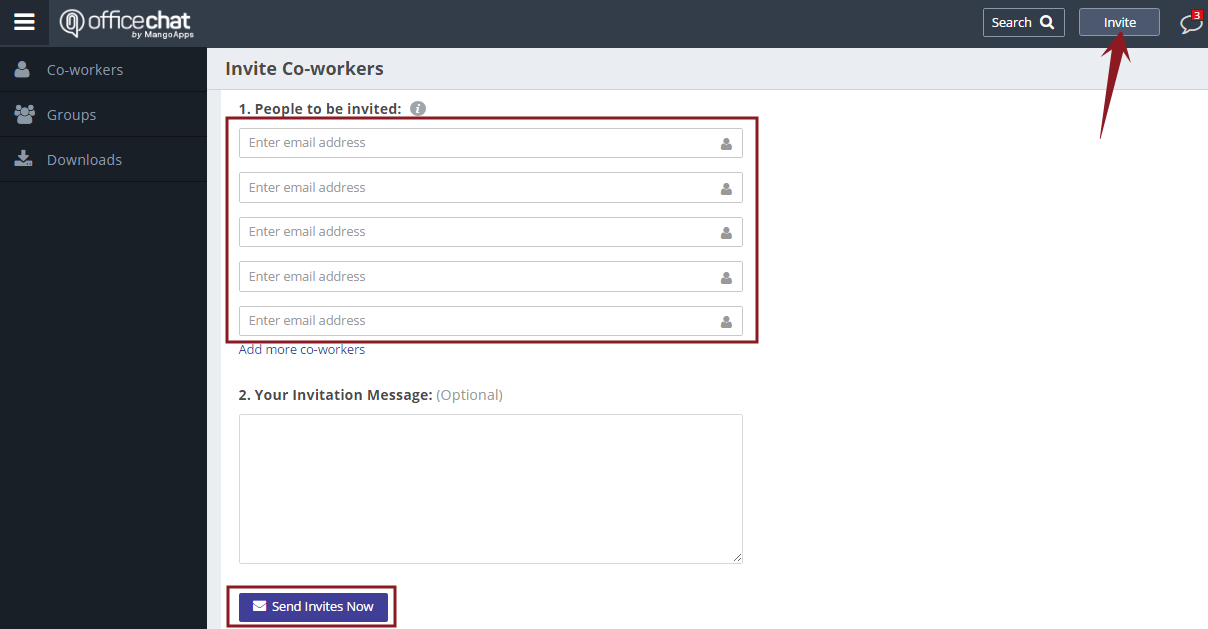
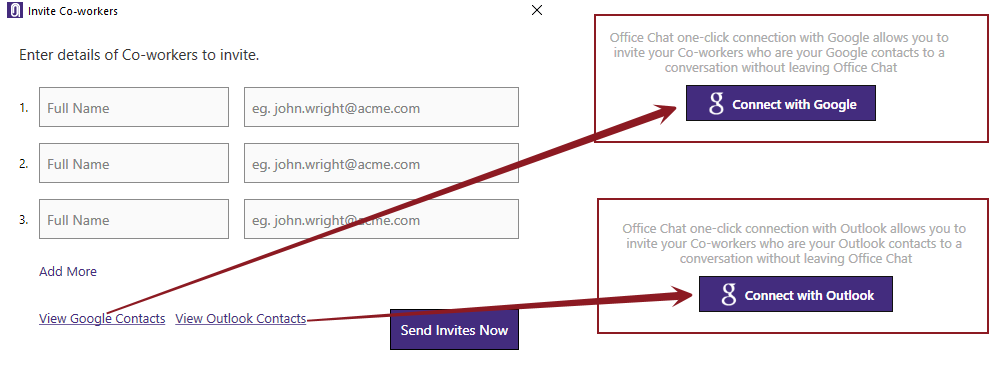
Click on “Invite” button on the top bar and then enter valid email addresses of the co-workers you wish to invite. Enter invitation message (optional) and click on the “Send Invites Now” button.
Option 2: To invite a new user by connecting with your Google, Outlook and phone contacts.
Office Chat for Windows
For Google contacts, enter your gmail account details on the screen which is shown after you click on “Connect with Google” button.
For Outlook contacts, click “Connect with Outlook” button in order to import the list of your Outlook contacts.
Office Chat for iOS
For Google contacts, enter your gmail account details on the screen which is shown after you click on “Connect with Google” button.
Phone contacts load once you allow the app to access your phone contacts.

Office Chat for Android
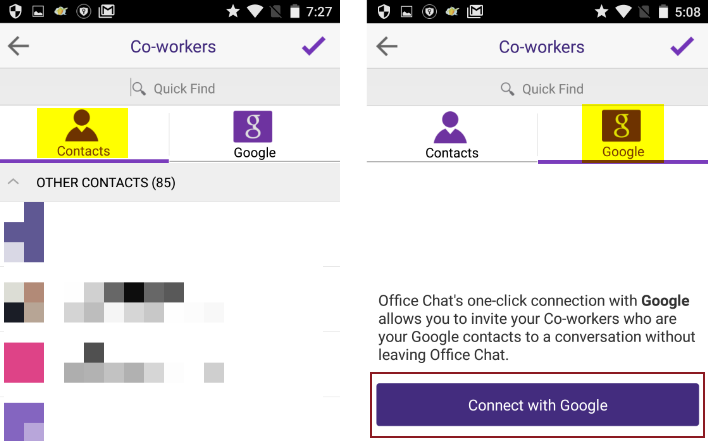
For Google contacts, enter your gmail account details on the screen which is shown after you click on “Connect with Google” button.
Phone contacts load automatically.
Office Chat for Mac
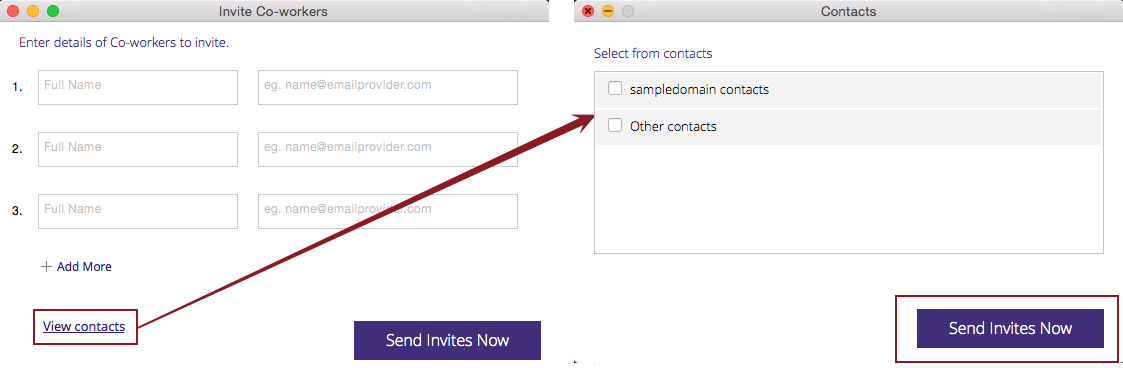
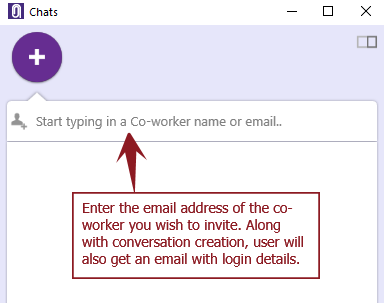
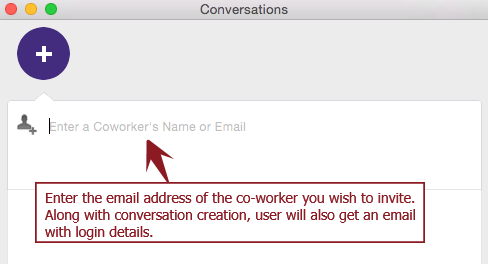
Option 3: Users can also enter the email addresses directly in the To: field on Compose new conversation screen.
Office Chat for Windows
Office Chat for iOS
Office Chat for Android
Office Chat for Mac
How to remove users from a group
you need to be logged into the desktop client. Here is a video on the windows desktop client.
How do I delete my message?
July 10, 2014 by
You can delete individual messages by following these steps. These steps apply to individual messages you have sent. Deleted messages are permanently removed from your device, all office chat servers, and the recipient devices. This operation is irreversible and the deleted item cannot be recovered. This is an Office Chat Premium feature.
To delete a single message from a conversation:
- Open the private conversation or the team conversation.
- Scroll over to the message in the conversation.
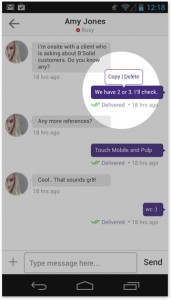
- On mobile, tap on the message you want to delete and then tap on the Delete action.
- On Windows, right click on the message you want to delete and then click on the Delete action.
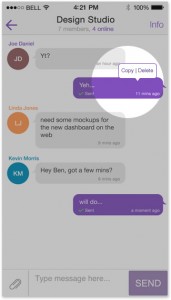
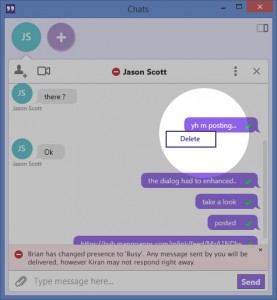
- On Mac, hover over the message you want to delete and then click on the Deleteaction on the top right of the message.
- The message is deleted and removed from your chat history immediately.
- For the recipients of this message, the message is deleted when the chat history at their end is refreshed.
How do I delete a group?
July 10, 2014 by
In Office Chat, only the group creator can delete the group. Deleted groups and all messages in them are permanently removed from your device, all Office Chat servers, and group member devices.
Please note: This operation is irreversible and the deleted group cannot be recovered.
Here are the steps:
Office Chat for Windows Desktop
Open the Group’s chat window and click on the 3 dots button to select “Delete Group”. A confirmation message will populate before the group is deleted permanently.

Office Chat for Mac
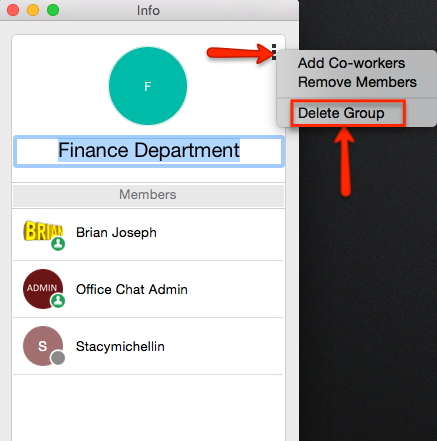
Open the Group’s chat window and click on the 3 dots button to select “View Group Info”.
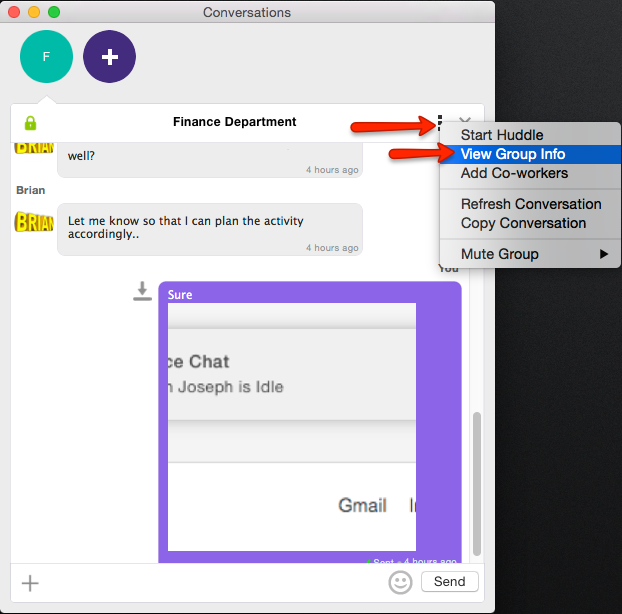
After this, on the Group Info screen again click on the 3 dots button and select the option “Delete Group”. A confirmation message will populate before the group is deleted permanently.
Office Chat for iOS
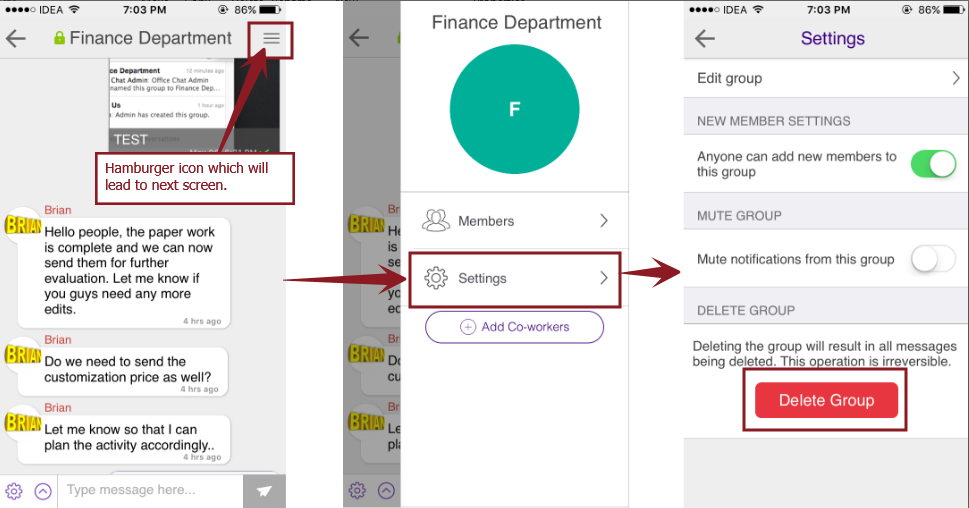
Open the Group’s chat window and click on the 3 lines hamburger icon on the top right corner. Click “Settings” in the new window. Select “Delete Group” button.
Office Chat for Android
Open the Group’s chat window and click on the 3 lines hamburger icon on the top right corner. Click “Settings” in the new window. Select “Delete Group” button.

Domain Admin
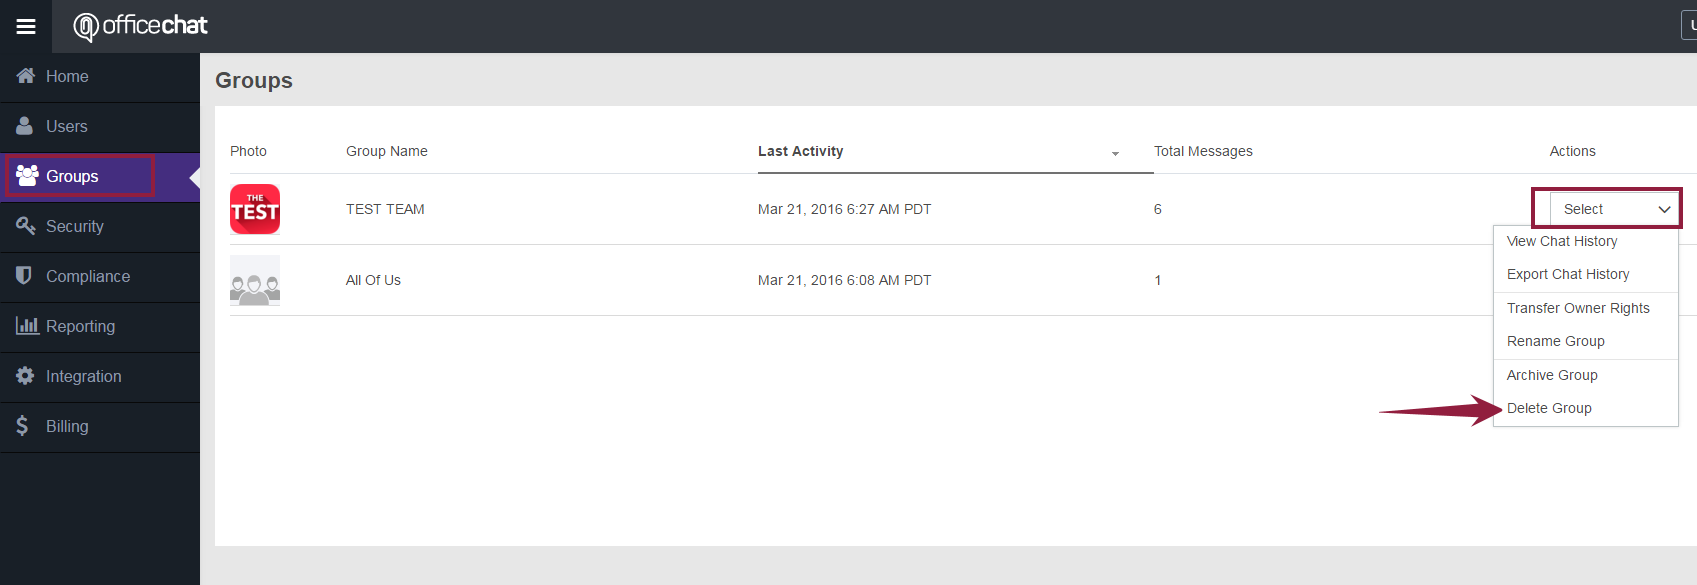
- Open Office Chat on your web browser as the admin.
- Go to the Admin Portal on the top right.
- Click on Groups in the left hand navigation menu.
- Find the group you want to delete
- On the right hand side you’ll see the “Actions” column, in the corresponding column select Delete Group in the drop down menu.
in groups selecting the drop down in the actions.
Additionally, if you are on Office Chat Premium/Enterprise plan, then the network admin can delete any group from the office chat admin portal.
How do I create a new group chat?
July 10, 2014 by
To create a new group chat:
- Start a chat with a single colleague from the “CoWorkers & Teams” tab.
- Add additional users to the same conversation by typing their name or email ID.
- Users’ chat contributions will show in the chat history with their Profile picture and email ID showing.
- The group chat history will be saved so that offline members can review the chat when they come online.
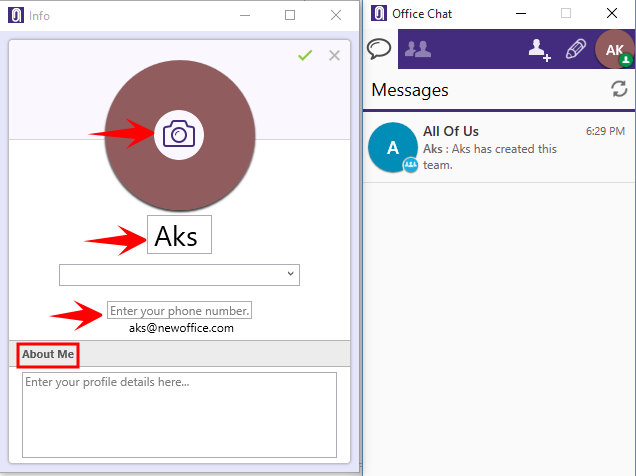
How do I change my account info (name, photo, etc)?
July 10, 2014 by
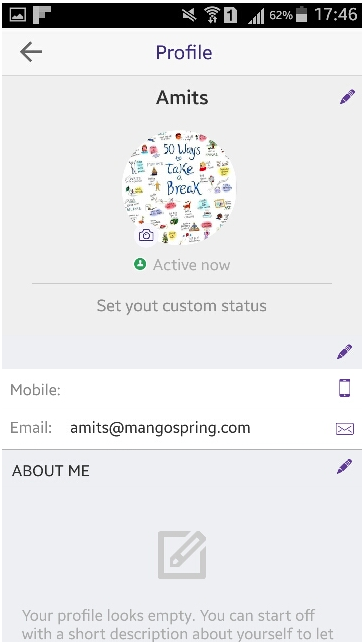
Your profile allows you to change your account info. To edit your profile:
Office Chat for Window
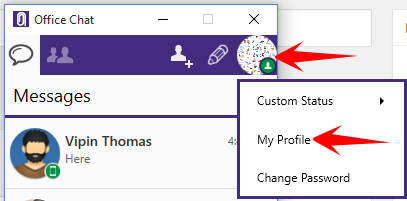
- In the Office Chat window, click on your profile picture or placeholder in the top-right then click “My Profile”:
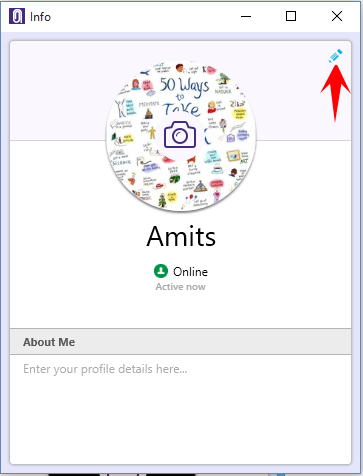
- Click on the pencil “Edit” icon to start editing/updating your profile.
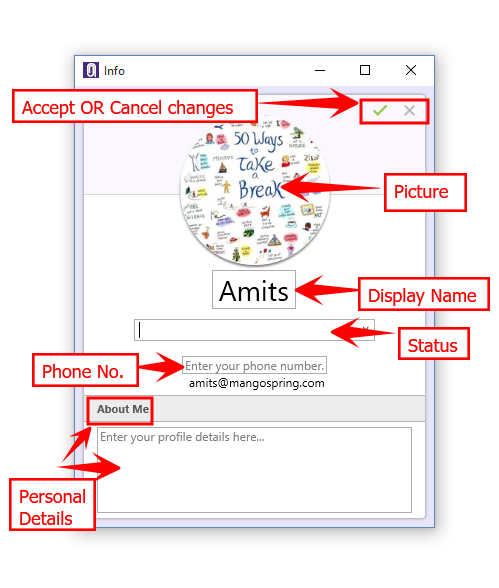
- your profile photo to change the picture or click on the pencil in the top right to edit the other information:
Android
Click on the “More” menu at the bottom and click the arrow next to your name.
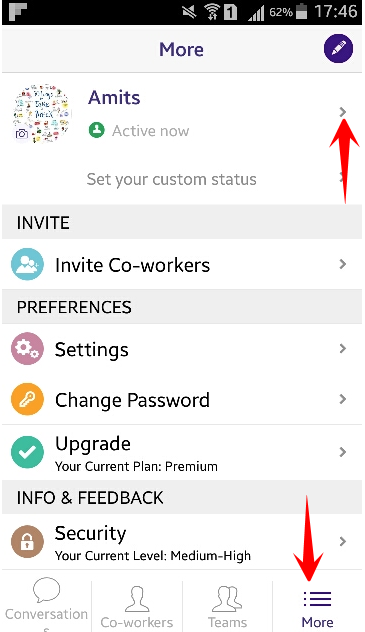
Fill in the details required by clicking on the pencil edit icon and save them accordingly.
iOS
Mac
Click on your image on the top right and select “View Profile”
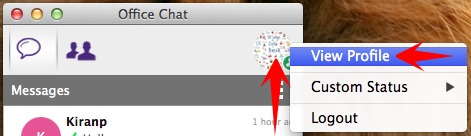
Update the details and save them accordingly.

Office Chat Quick Start Guide
July 9, 2014 by
What is Office Chat?
Office Chat is a secure mobile messaging service for the business world designed for fast, action-oriented communication in teams and one-to-one. Communicate with pictures, files, videos and audio messages. Cross-platform messaging on Web, iPhone, iPad, Android and Windows Desktop has never been easier. With a long-term focus on high employee engagement, Office Chat quickly makes messaging the preferred medium for workplace communication.
Gettings Started with Office Chat video?
The Office Chat Client
The Office Chat client is the easiest to get started with and start communication with your teams and colleagues. Download the app from http://officechat.com/office-chat-download, just sign up, sign in, and get down to business communication.
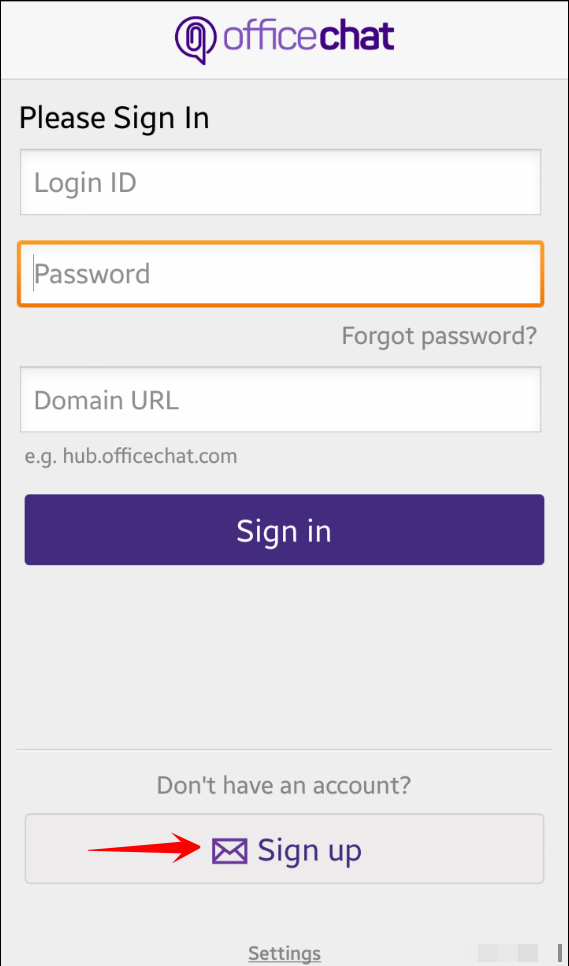
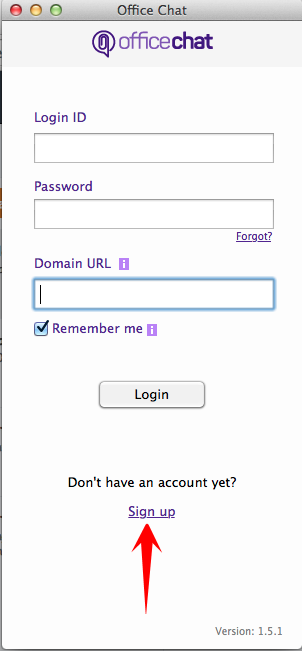
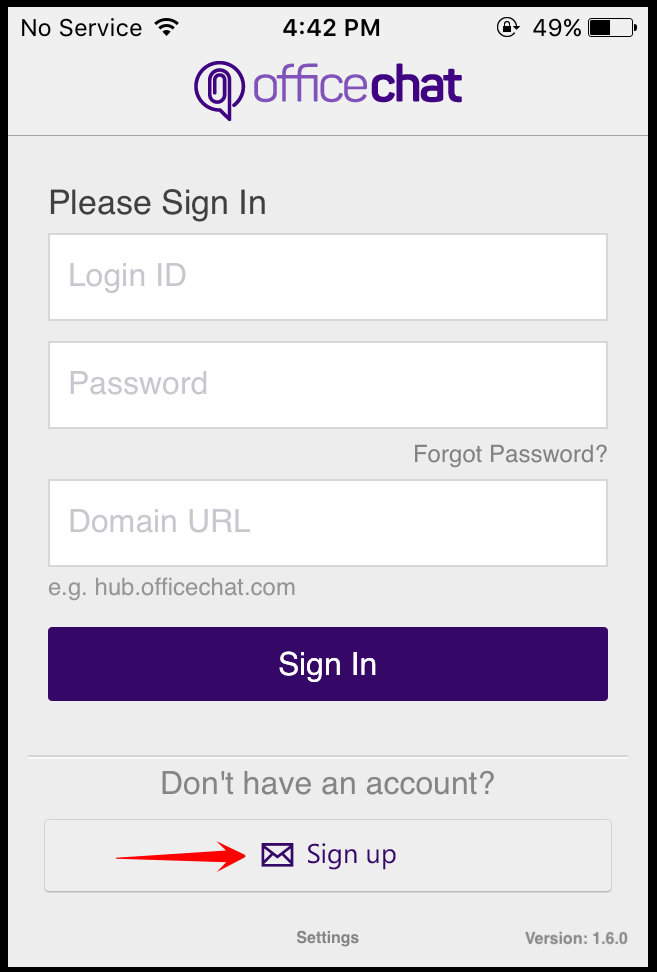
Click on the Sign up button on the respective platform to star the Sign-up process
1. Web

2. Windows Desktop App
3. Android
4. Mac
5. iOS
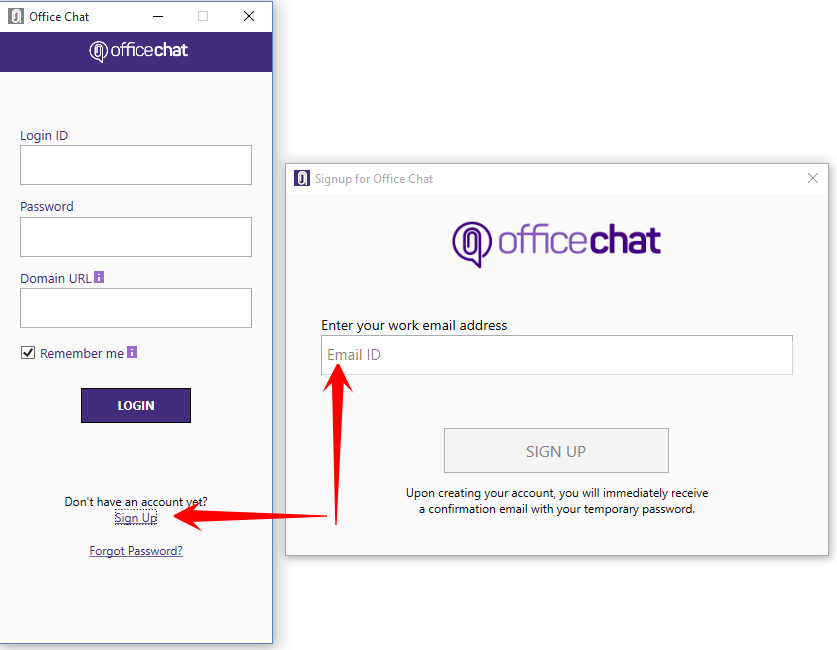
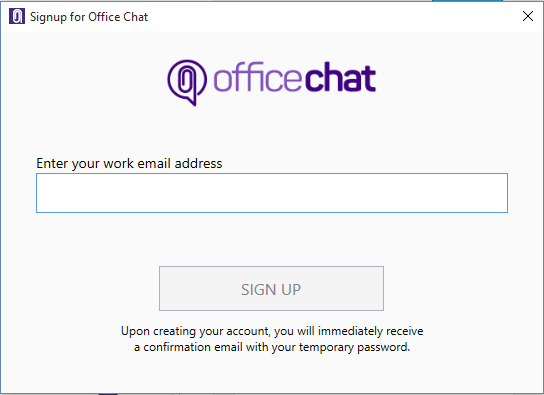
Enter your email ID and click Sign Up.
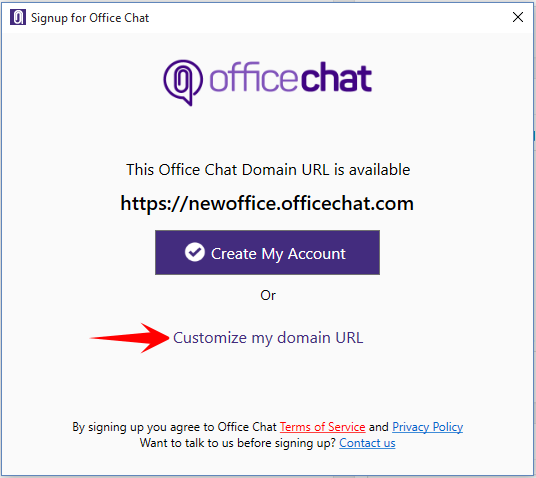
By default, your Office Chat domain will be created with your email domain name and apprehend it with .officechat.com.
For example, if your email ID is abc@xyz.com then your default Office Chat domain created will be xyz.officechat.com. However, you will have the option to customize your domain URL. Click “Customize my domain URL
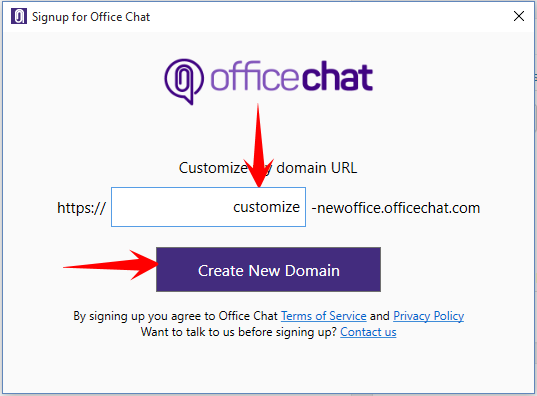
The system will prompt you to create a custom domain URL. Type the URL you want for your Office Chat domain and click “Create New Domain”
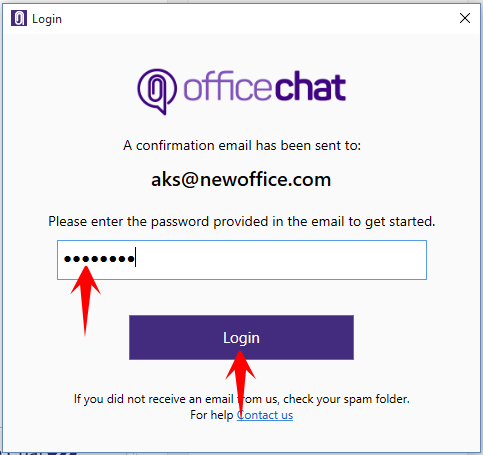
A new window will open asking you to type the password. As a security measure, you’ll receive an email with your temporary password. Use that password to sign in for the first time.
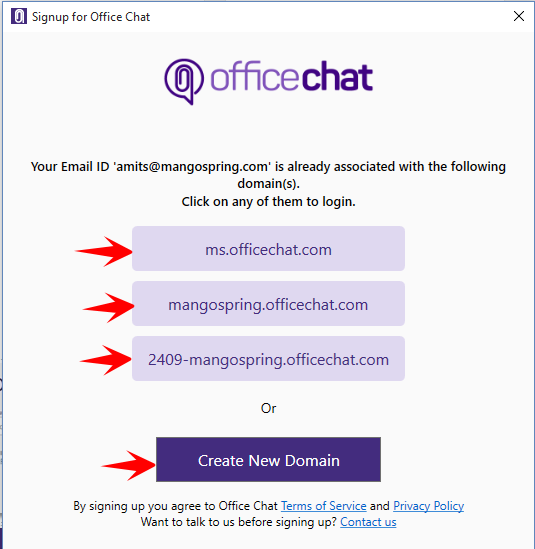
If the email ID is already a part of an existing Office Chat domain, the system will prompt you for the same asking you to login to that domain. If you still wish to create a new domain, click on the button “Create New Domain”
Once you are signed into Office Chat for the first time, you will be prompted to fill in the details about yourself to show up in your Office Chat profile. You can upload your profile photo, Change your Display name, change the status, Enter your phone number and a little description about yourself. These are not mandatory fields so a user can close this window in case he/she does not want to update the same.
You are all set to start inviting your friends and colleagues to start chatting with them along with sharing files/documents/videos/audios.
You will notice a default team created with the name “All of Us”. Any user whom you or your colleague invite will automatically become a member of this team letting you or anyone chat with all of them together.
Invite Colleagues to Office Chat
Inviting colleagues to Office Chat is as easy as starting a chat and entering their email address. Invited colleagues get an email telling them where to go and what to do to log in to Office Chat to continue the conversation.
Even if they don’t log in or download a mobile or desktop client, they can respond to your conversation from the email that they receive. You’ll see their response in the conversation that you started.
Now, it’s the time to start inviting your friends/colleagues. To invite, follow the article here
Once you have invited all the users to be a part of your domain and those users have signed into Office Chat, you can start the collaboration through 1×1 chat, Team chat, and file sharing.
Office Chat Messenger
To start a chat…
- Go to the “Messenger” in Office Chat and choose the (pencil) “Start a Conversation” icon.

- Start typing an email address or colleague’s name or click the “Plus” sign to choose one or more colleagues that are already in Office Chat.
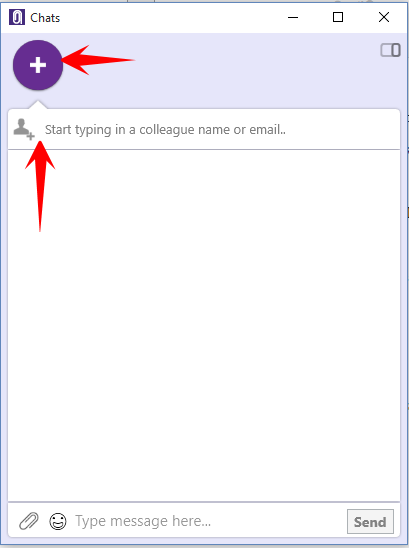
- Then just type your message.
It’s that easy, feel free to review this video with the same instructions.
What do I do now?
Start chats.
If you have something you’re working on with colleagues, add them to Office Chat and start getting work done faster.
As colleagues get accustomed to working through Office Chat, teams will automatically start being formed just based on work collaboration.
Soon you’ll be able to quickly find the documents, pictures, videos, and audio associated with that team from anywhere… on desktop, on iPhone, iPad, or Android.